

Last updated: November 3, 2026
Concrete cleaning is the work of removing dirt, stains, and growth from a concrete surface without etching the slab, stripping a finish, or pushing dirty water where it does not belong. Pressure is only one part of it. The cleaner you choose, the nozzle on the wand, and the distance you hold it from the surface matter just as much, and they matter more when the stain has had months to soak into the pores.
I learned that the hard way on my own driveway, years ago, by starting with the narrowest nozzle I owned and wondering why a pale stripe appeared where I had lingered. Concrete looks indestructible, so it invites a heavy hand. It is not. A concentrated jet held too close will carve a line into the top layer, and that line does not wash out. This guide is built around the opposite habit: let the cleaner do the loosening, let a wide fan do the rinsing, and keep the wand moving. If you want the wider picture across driveway materials, our driveway cleaning guide covers concrete, asphalt, and pavers side by side. This article stays on concrete, and goes deeper on it.
Contents
- Read the slab first: the stain map
- Choose the pressure, nozzle, and cleaner
- The step sequence, start to finish
- Stain by stain: oil, rust, growth, and more
- Surfaces that need a softer touch
- Mistakes that etch, streak, or stain concrete
- Runoff, plants, and neighbours
- DIY or hire it out
- After washing: dry, inspect, and decide what is next
- Frequently asked questions
- Sources
Read the slab first: the stain map
Before you pick up a washer, spend ten minutes reading the slab. Most concrete stains fall into a small set of groups, and each group wants a different cleaner. A degreaser will not lift rust, and an acid wash will not kill the growth hiding in a shaded corner. Guessing wrong costs an afternoon, and in the case of strong acids, it can leave a pale patch that outlasts the stain you were trying to remove.
| What you see | Likely cause | First move |
|---|---|---|
| Dark, greasy patch where a car parks | Motor oil or transmission fluid | Absorbent first, then an alkaline degreaser |
| Orange or brown streaks near metal, tools, or fertilizer spills | Rust or fertilizer metals | A rust remover made for concrete, used briefly and rinsed well |
| Green or black film, worst in shade and damp corners | Algae, mold, or mildew | An oxygen-based wash or diluted bleach wash, then a thorough rinse |
| Black arcs where tires turn | Rubber and road film baked on by heat | A degreaser plus scrubbing, or a surface cleaner pass |
| White powder or crust | Efflorescence, mineral salts drawn out as water dries | A dry brush first, then a mild wash, and chase the water source |
| Brown leaf or tannin marks | Leaves, grass, and sap left wet on the slab | An organic stain cleaner, scrubbed and rinsed |
| General gray dullness, no single stain | Road film, dust, and age | A general concrete cleaner and a surface cleaner pass |
Two checks belong before any washing. First, walk the whole area and note cracks, crumbling edges, spalled patches, and joints that have lost their seal. Cleaning will not fix those, and a hard jet aimed into a crack can widen it, so mark them and work around them. Second, check whether the surface is sealed, stained, stamped, or colored. A sealed or decorative slab needs gentler pressure and gentler chemistry than plain cured concrete, and a test patch in a hidden corner will tell you more in ten minutes than any product label. If the stain map points to a black film you cannot quite name, our guide on why a concrete driveway turns black walks through the lookalikes before you choose a cleaner.
Choose the pressure, nozzle, and cleaner
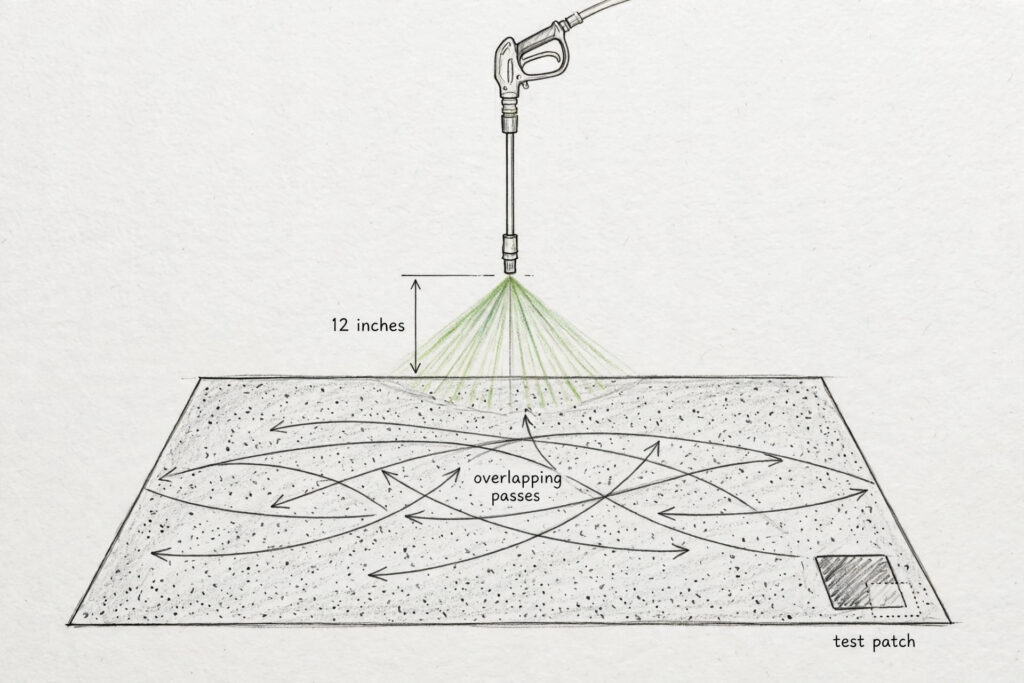
For plain, cured, unsealed concrete, a good starting range is 2,000 to 3,000 PSI with a 25-degree green tip or a surface cleaner, held about 12 inches from the surface and kept moving in overlapping passes. That range is not a rule carved in stone. It is a starting point, and the test patch is what turns it into the right setting for your slab. Older, worn, sealed, or decorative concrete starts lower, and you only step up if the dirt stays put after a proper cleaner and dwell time.
The reason pressure alone is a poor plan is simple: concrete is porous. Dirt and oil sit inside the pores, not just on top, and blasting the surface does not pull them out. A cleaner loosens them, dwell time lets it work, and the washer mostly rinses the result away. When a stain survives a first pass, the answer is usually a better-matched cleaner or a second pass, not a narrower nozzle held closer.
| Surface or job | Starting pressure | Tip to start with | Cleaner to start with | Main risk |
|---|---|---|---|---|
| Plain cured concrete, general dirt | 2,000 to 3,000 PSI | 25-degree green tip or surface cleaner | General concrete cleaner | Etching if you linger in one spot |
| Light dirt, patio, or pool deck | 2,000 to 2,500 PSI | 40-degree white tip | Mild detergent | Streaks from uneven passes |
| Oil or grease stain | 2,500 to 3,000 PSI | 25-degree green tip | Alkaline degreaser | Oil driven deeper if you skip the absorbent step |
| Green or black growth | 2,000 to 2,500 PSI | 25-degree green tip | Oxygen-based wash or diluted bleach wash | Growth returning fast if the damp cause stays |
| Stamped, stained, colored, or sealed concrete | 1,200 to 2,000 PSI | 40-degree white tip | Mild, sealer-safe cleaner | Stripping sealer or color |
| New concrete, under about 28 days old | Do not pressure wash yet | Garden hose and soft brush only | Water only | Surface damage before the slab has cured |
Nozzle color is the quickest way to get this wrong, so it is worth spelling out. The red 0-degree tip fires a pencil jet that can etch concrete in seconds, and it has no place in general cleaning. The yellow 15-degree tip is narrower and stronger than most concrete jobs need, and it belongs, if anywhere, on a small stubborn spot held at a careful distance. The green 25-degree tip is the workhorse for concrete. The white 40-degree tip is the gentler choice for rinsing and for delicate finishes. The black soap tip runs at low pressure and is the one that lets the machine draw detergent. The Concrete Network guide to pressure washing concrete makes the same practical point: keep the nozzle about 12 inches from the surface, work in a steady sweeping motion, and test a less visible spot first, because older or decorated concrete responds differently to a hard stream.
Flow rate, measured in gallons per minute, decides how fast you finish. A machine rated around 3,000 PSI with a flow of at least 2.5 gallons per minute will clean a typical driveway at a sensible pace, and a surface cleaner attachment will speed the flat work and cut down on zebra stripes. The same Concrete Network equipment guide notes that contractors often prefer higher flow rates for heavily soiled concrete, since flow is what flushes loosened dirt away. If you only wash once or twice a year, renting a mid-size gas or electric machine is usually cheaper than buying one, and you skip storing and maintaining it.
The step sequence, start to finish
A clean result comes from doing the steps in order, not from turning the pressure up. The sequence below works for a driveway, a patio, and a sidewalk, and it takes most of a morning for a two-car driveway once pre-treating and drying are counted. Rushing the dwell time is the most common reason a first wash looks patchy.
- Clear and sweep. Move cars, planters, toys, and anything that can blow around. Sweep loose dirt, leaves, and grit off the slab, and blow or brush debris out of joints and cracks. Grit left on the surface gets driven around by the jet and can scratch a sealed finish.
- Protect what is nearby. Close windows and doors near the work area, move potted plants back, and wet down garden beds and grass at the edge of the slab before you start. Wet foliage is less likely to take up cleaner, and a quick rinse after washing helps too. Cover a storm drain near the work area if local rules allow a temporary cover, and plan where the rinse water will go before you pull the trigger.
- Test patch. Pick a hidden corner, apply your cleaner, wait the label time, and wash a small square at your starting pressure and distance. Let it dry for a few minutes and look at it in daylight. If the surface looks scoured or the color changed, drop the pressure or widen the tip before you touch the main area.
- Pre-treat the stains. Apply the right cleaner to each stain from the stain map, not one product for the whole slab. Oil gets a degreaser, growth gets an organic wash, and general grime gets a mild detergent. Give each cleaner its dwell time, usually 5 to 15 minutes, and keep it wet. Cleaner that dries on concrete can leave its own mark, which is a frustrating way to finish a job.
- Wash in overlapping passes. Start at the highest point and work downhill so dirty water runs away from clean concrete. Hold the wand about 12 inches out, keep it moving, and overlap each pass by about a third so you do not leave stripes. A surface cleaner does this more evenly than a wand on a large flat area, and it saves your arms on a long driveway.
- Scrub the stubborn spots. After the first pass, scrub any stain that is still visible with a stiff-bristle brush and a second application of the matched cleaner. Do not answer a stubborn stain with a narrower nozzle held closer. That trades a stain for an etch mark.
- Rinse wide and slow. Switch to the white 40-degree tip and rinse the whole area from high to low until the water runs clear and no cleaner remains. Check joints and low spots, where cleaner likes to pool, and rinse those twice.
- Let it dry before you judge it. Concrete often looks patchy when wet and even once dry, so do not chase a damp patch with more pressure. Give it a few hours in sun and air, then inspect in daylight and note any stain that truly survived for a targeted second treatment.
Safety gear belongs in the sequence, not as an afterthought. Wear safety glasses or goggles, closed-toe shoes with grip, long pants, and waterproof gloves. Keep the jet away from your feet, hands, pets, and anyone walking past, and never point it at yourself to clear a clog. A high-pressure jet can cut skin, and that injury needs prompt medical care, so treat the wand like a power tool. Stay off ladders with a washer in hand: the kick of the trigger can push you off balance, and an extension wand reaches from the ground instead. For an electric machine, use a ground-fault protected outlet and keep connections dry and off the wet slab where you can.
Stain by stain: oil, rust, growth, and more
General washing handles gray dullness and road film. Named stains need named methods, and the order of operations matters for each one. The table in the first section tells you where to start. This section fills in the method, and the mistakes that make each stain worse.
Oil and grease. For a fresh spill, cover it with cat litter, sawdust, or baking soda and leave it for hours to pull up what it can. Sweep that up, then apply an alkaline degreaser, let it dwell, scrub with a stiff brush, and wash. Old oil that has soaked deep into unsealed concrete may only lighten, not vanish, and a poultice, a paste of absorbent material and cleaner left to dry on the stain, is the next step before you accept a faint shadow. The Concrete Network driveway cleaning guide gives the same order: absorbent first for fresh spills, then a concentrated alkaline cleaner to loosen what remains.
Rust and fertilizer marks. Rust comes from metal furniture, tools, and fertilizer granules that sat wet on the slab, and it answers to a rust remover made for concrete, not to a degreaser. Apply it to a small area first, keep the contact time short, and rinse thoroughly, because acidic cleaners can etch concrete and change its profile if they sit too long. The Concrete Network guide warns about exactly that, and suggests testing an acid cleaner in a small area before a wider application. If the first application only fades the mark, repeat it rather than leaving a stronger mix on longer.
Green and black growth. Algae, mold, and mildew love shade and dampness, and they return fast if you only blast the visible film off. Apply an oxygen-based wash or a diluted bleach wash, let it dwell, scrub, and rinse well. Never mix bleach with other cleaners, and wear gloves when you scrub with it. Then fix the damp cause where you can: trim back the hedge that keeps the corner shaded, or clear the gutter overflow that keeps the slab wet. If water keeps sitting on the slab after rain, read why water pools on a driveway before you wash again, because a drainage problem will undo a clean slab in one wet season.
Efflorescence, the white powder. Efflorescence is mineral salt drawn out of the concrete as water moves through it and dries. Brush it dry first, then wash mildly and rinse. The salt itself is easy to remove. The hard part is the water path behind it, so look for the source: a downspout dumping at the slab edge, a low spot that ponds, or a sprinkler that soaks the same corner every day. Wash the salt, then chase the water, or the white crust will be back.
Tire marks and leaf stains. Hot tire marks are rubber and road film baked onto the surface, and they usually yield to a degreaser, scrubbing, and a surface cleaner pass. If the marks sit in a sealer rather than on bare concrete, cleaning may only fade them, and the sealer itself may need attention. Leaf and tannin marks answer to an organic stain cleaner, applied to damp concrete, left 10 to 15 minutes, scrubbed hard, and rinsed, with a repeat if the outline is still visible after drying.
Surfaces that need a softer touch
Not every concrete surface wants the same wash, and the exceptions are where most damage happens. New concrete should not be pressure washed at all for about its first month, while it cures, and a garden hose and soft brush are the right tools until then. Stamped, stained, and colored concrete should be washed at lower pressure with a wide tip, because a hard jet can strip color and sealer and expose aggregate that was meant to stay buried. Sealed concrete follows the same rule: if you are not sure what sealer is on it, start with the gentlest cleaner and the widest tip, and test in a corner.
Worn concrete needs judgment too. A slab that is already spalling, flaking, or crumbling at the edges will not get stronger under a jet, and washing it hard can pull more surface away. Wash it gently, or not at all, and put the effort into the repair decision instead. Our concrete driveway maintenance guide covers the longer maintenance picture for a slab in that condition, including when cleaning stops being the right job. For surfaces other than concrete, the pressure and chemistry change completely, and our soft washing versus pressure washing guide maps which surfaces want a soft wash and which can take pressure.
Mistakes that etch, streak, or stain concrete
Most concrete damage from washing is not bad luck. It is one of a short list of habits, and all of them are avoidable once you have seen them named. The first is starting with the red tip, or any narrow tip, on a flat slab. The second is holding the wand still, even for a few seconds, while you look at a stain. The third is skipping the test patch on a sealed or colored surface and discovering the sealer is gone only when the whole driveway looks different. The fourth is letting cleaner dry on the slab, which leaves its own pale or streaked mark. The fifth is washing uphill, so dirty water runs over the clean section you just finished.
Two more mistakes show up after the wash, not during it. One is judging the result while the slab is still wet and chasing damp patches with more pressure, which etches a slab that would have dried evenly. The other is washing a stain with the wrong chemistry and setting it deeper: acid on an oil stain does nothing useful, and a degreaser does nothing for rust. The stain map exists to stop that second mistake, and the test patch exists to stop the first three. Keep both habits, and a concrete wash stays a routine job instead of a repair job.
Runoff, plants, and neighbours
Wash water has to go somewhere, and where it goes is part of the job. Dirty rinse water carries detergent, oil residue, and loosened grime, and it should not run straight into a storm drain, a stream, or a neighbour’s yard. Check your local rules before you wash, because municipal codes vary, and some places restrict what can enter storm sewers. The Concrete Network equipment guide makes the same caution in plain terms: runoff rules depend on the chemicals used and the contaminants removed, so check with the local environmental authority for disposal requirements.
For a typical home wash, the practical habits are straightforward. Work on a dry, calm day so the water goes where you expect it. Keep wash water on your own property and directed to a permeable area, like grass or gravel, where it can filter, rather than down the street to a drain. Use the smallest amount of detergent that works, and rinse plants and grass at the slab edge before and after washing. If you are washing a large commercial area, or the runoff carries heavy oil or paint, that is a different job, and a pro with containment and recovery equipment is the right call.
DIY or hire it out
Most plain concrete driveways, patios, and sidewalks are fair DIY work with a rented machine, a surface cleaner, and a morning to spare. The job stops being DIY when the risk or the scale grows past what a rented machine and a careful homeowner can handle safely. The table below is the honest split, not a sales pitch in either direction.
| Situation | DIY or hire a pro | Why |
|---|---|---|
| Plain cured concrete, general dirt and light stains | DIY | A rented machine, a green tip, and the sequence above will handle it |
| Large driveway, heavy staining, or a whole property | Either, lean pro | A pro machine with higher flow finishes faster and more evenly |
| Stamped, stained, colored, or sealed concrete | Lean pro | One wrong setting strips color or sealer, and repair costs more than the wash |
| Deep oil, paint, or chemical contamination | Pro | Containment, runoff handling, and stronger chemistry need proper equipment |
| Cracked, spalled, or structurally suspect slab | Pro, after a repair check | Washing can widen damage, and the repair decision comes first |
| Second-story work, steep slopes, or work near traffic | Pro | Fall and traffic risk outweigh the saving |
If you do hire this out, ask how they will protect nearby plants and drains, what pressure and tip they plan to use on your surface type, and whether they test a patch first. Our questions to ask a pressure washing company covers the full list, including insurance and runoff handling, so you can compare quotes on method rather than on price alone. A cheap quote that plans to blast a sealed driveway at full pressure is not a bargain.
After washing: dry, inspect, and decide what is next
Once the slab is dry, walk it again in daylight with the same eye you used for the stain map. Note any stain that survived, any crack that the wash revealed, and any area where the surface looks different from the rest. A stain that survived two matched treatments is telling you something: it may be deep in the pores, it may be in the sealer rather than on the concrete, or it may be a repair problem wearing a stain’s clothes. That distinction decides the next step, and guessing it wrong wastes another wash.
Sealing is the question most people ask next, and it deserves its own answer rather than a rushed yes at the end of a washing guide. A penetrating sealer can slow future staining on unsealed concrete, but it needs a fully dry slab and the right product for the surface, and a sealed or colored slab may need a different product or none at all. We will cover that decision in a dedicated guide, and until it is live, the safest rule is to let the slab dry for several days and check the sealer guidance in our concrete driveway maintenance guide before you buy anything. If washing revealed a wide or deep crack, do not seal over it: get the crack assessed first, since cleaning and sealing are cosmetic work on a slab that may need repair.
Keeping the slab clean after a wash is mostly habit. Sweep it regularly, rinse off leaves before they stain, deal with oil drips while they are fresh, and wash the shaded corners before growth gets a foothold. A light wash once or twice a year beats a heavy rescue wash every few years, and it keeps you in the gentle pressure range where concrete lasts longest.
Frequently asked questions
For plain, cured, unsealed concrete, start at 2,000 to 3,000 PSI with a 25-degree green tip or a surface cleaner, held about 12 inches away. Drop to 1,200 to 2,000 PSI with a 40-degree tip for stamped, stained, colored, or sealed concrete, and do not pressure wash concrete younger than about 28 days.
Yes, for general dirt and road film, water and a surface cleaner will do a fair job. Named stains still need a matched cleaner: a degreaser for oil, a rust remover for rust, and an organic wash for growth. Water alone will lighten most stains, but it rarely removes a set-in one.
It can, if the nozzle is too narrow, the wand is held too close, or it stays still in one spot. Etching, surface flaking, and stripped sealer are the usual results. A green or white tip, about 12 inches of distance, steady movement, and a test patch keep the risk low on plain cured concrete.
Start with an absorbent to pull up what it can, then apply an alkaline degreaser, let it dwell, scrub with a stiff brush, and wash. Repeat rather than raising the pressure. A deep, old stain may only lighten, and a poultice left to dry on the stain is the next step before you accept a faint shadow.
That is usually efflorescence, mineral salts drawn out as water moves through the concrete and dries. Brush it dry, wash mildly, and rinse. If it keeps coming back in the same spot, look for the water source behind it, like a downspout outlet or a low spot that ponds.
A diluted bleach wash can treat mold and mildew on plain concrete, but use it with care: wear gloves, protect nearby plants by wetting them first and rinsing after, and never mix bleach with other cleaners. An oxygen-based wash is a gentler first choice for most growth, and it is kinder to plants.
Most driveways benefit from a light wash once or twice a year, with spot treatment for oil drips and growth as they appear. Shaded, damp driveways may need the growth corners treated more often, while a dry, sunny slab can go longer between full washes.
Sources
The methods and pressure ranges in this guide were checked against the Concrete Network guide to pressure washing concrete, which covers nozzle distance, flow rate, surface cleaners, and runoff disposal, and the Concrete Network guide to cleaning a concrete driveway, which covers cleaner choices for oil, mold, tire marks, fertilizer stains, and leaf stains, with cautions on acid cleaners and new concrete. Runoff advice follows the general practice in those guides: keep wash water off storm drains and check local rules for disposal.

6 Comments
Pingback: Driveway Cleaning Guide: Concrete, Asphalt, and Pavers
Pingback: Concrete Driveway Maintenance Guide: Clean, Seal & Repair
Pingback: How to Repair Large Cracks in a Concrete Driveway, Step by Step
Pingback: How to Cut Pavers: Wet Saw, Grinder & Splitter Compared
Pingback: How to Lay Brick Pavers: Patterns, Technique & Mistakes
Pingback: Can You Put Pavers Over Concrete? Overlay Guide