

Last updated: November 4, 2026
A large crack in a concrete driveway is a crack wider than about a quarter inch that has opened enough for water, dirt, and weed roots to get in, and it is repaired by cleaning it out, shaping its edges, setting a backer rod where it runs deep, and filling it with a flexible sealant or a patching mix matched to how much the slab still moves. That sounds simple, and the filling part is. The part that decides whether the repair lasts is everything you do before the tube comes out.
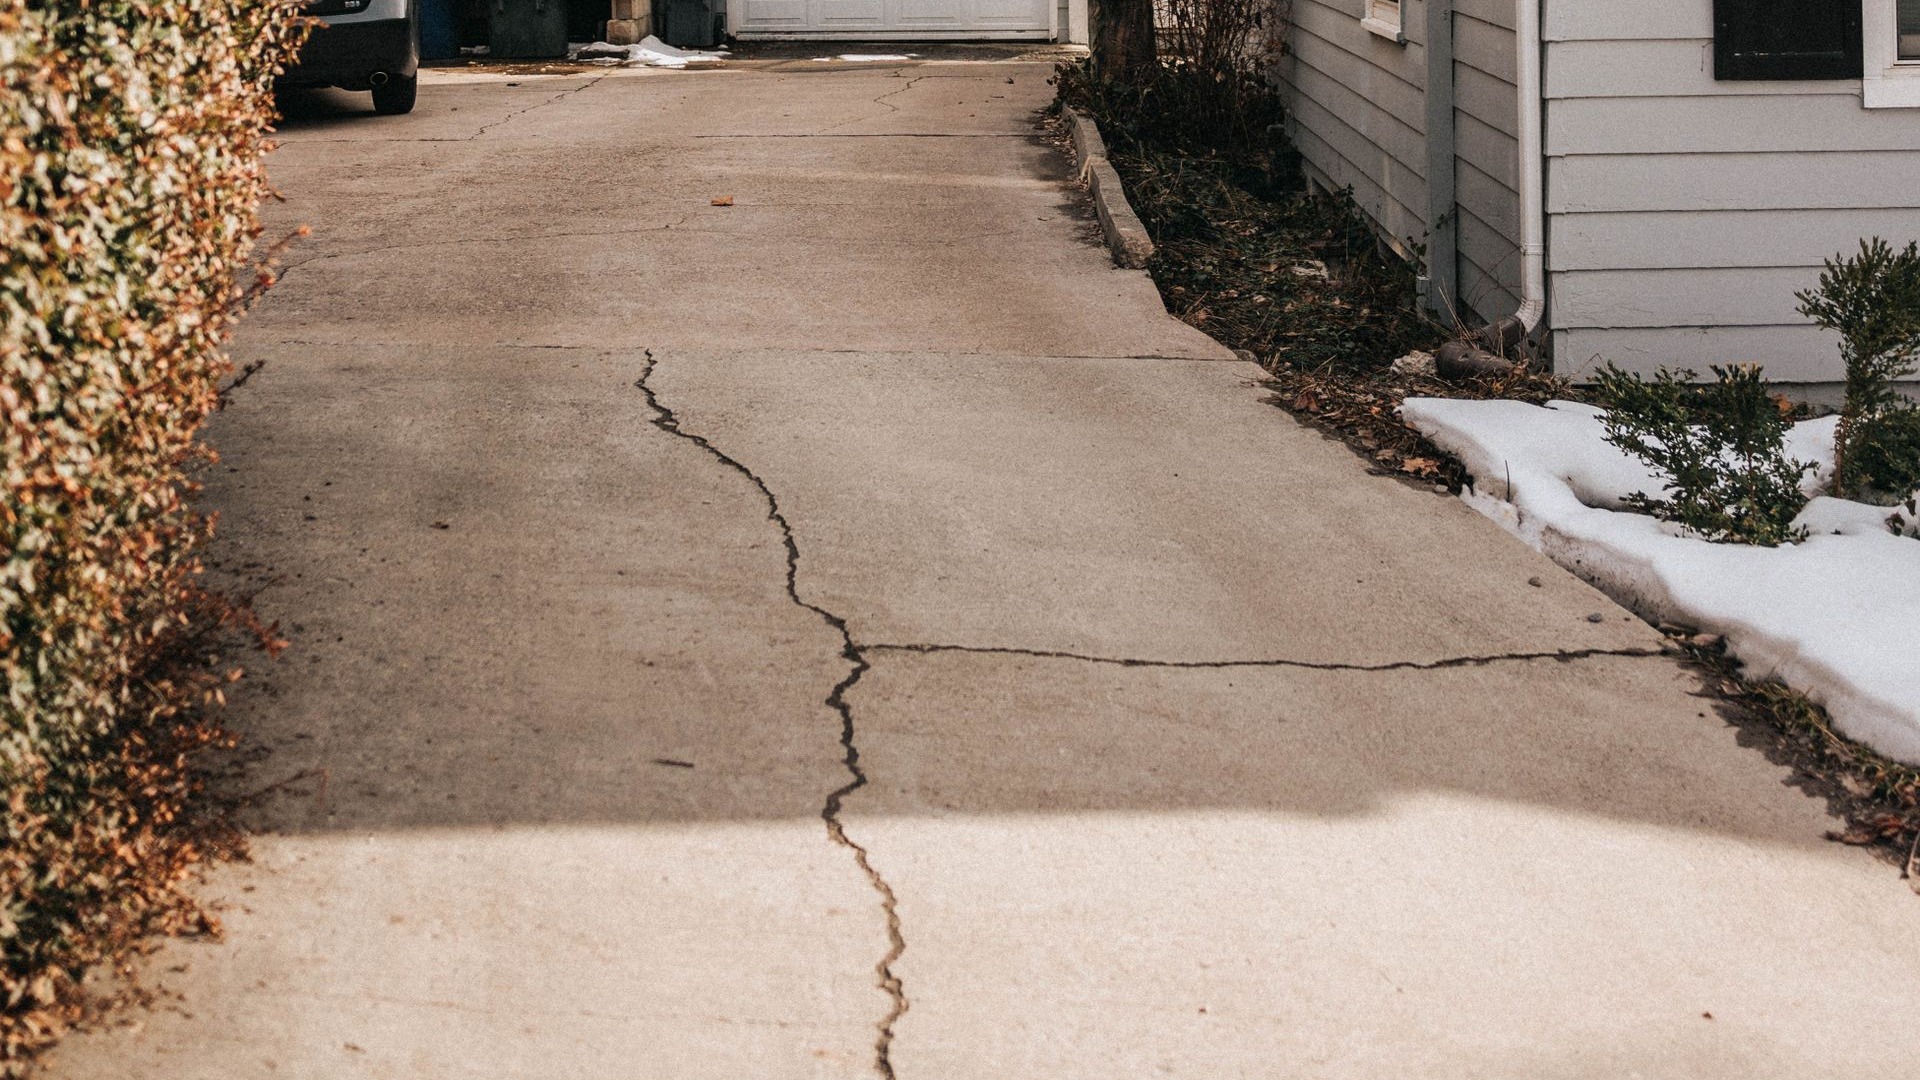
I first paid attention to this on a wash day, not a repair day. I had just finished cleaning a driveway, following the same approach in our concrete cleaning guide, when the rinse water drained away and left a crack I had walked over for months looking twice as wide as I remembered. Cleaning does not cause the crack. It strips the dirt and grime that was hiding it, and it shows you the real width, the crumbling edges, and the places where one side sits higher than the other. If that is what you are looking at right now, this guide starts where the wash left off: reading the crack honestly, then fixing it in a way that survives winter.
Contents
- Read the crack before you fill it
- Why large cracks form in a driveway
- Choose the right repair material
- Tools and materials
- The repair, step by step
- Tricky cases: wide gaps, broken edges, and sunken slabs
- Curing, sealing, and the first rain
- Mistakes that shorten a repair
- DIY or hire it out, and repair versus replace
- Keeping the repair fixed
- Frequently asked questions
- Sources
Read the crack before you fill it
A crack wider than a quarter inch is worth a close look before any filler goes near it, because width alone does not tell you whether a simple seal will hold or whether the slab underneath is still moving. Check three things: how wide it is at its widest point, whether one side sits higher than the other, and whether it is still growing. A stable crack with level sides is a sealing job. A crack with a step in it, or one that keeps widening month to month, is a symptom, and sealing it without understanding the cause buys you a season at most.
Measure the width with a ruler at several points along the crack, since a crack is rarely one width from end to end. Run a straightedge or a long level across it to feel for a lip: if a shoe catches on one side, the slab has shifted vertically. Mark both ends with chalk and note the date, then check again in a few weeks. A crack that has not moved is called dormant, and it will accept a rigid patch or an epoxy. A crack that is still moving is called active, and it needs a flexible sealant that can stretch and compress as the slab shifts with temperature and moisture. The Engineer Fix guide to sealing concrete cracks draws exactly this line, and it is the single most useful distinction in this whole job.
| What you see | What it usually means | Your move |
|---|---|---|
| Quarter inch to half inch wide, sides level, not growing | A stable, dormant crack, often shrinkage or an old joint that opened | Clean, shape, backer rod if deep, flexible sealant or patch |
| Half inch to 1 inch wide, sides level, not growing | A large stable crack, still a sealing job if the slab is sound | Backer rod essential, self-leveling polyurethane sealant, in layers if very deep |
| One side higher than the other, even a small lip | The slab has shifted or settled on one side | Do not just fill it. Get a concrete contractor to check leveling options first |
| Crack keeps widening over weeks or months | Active movement, soil, roots, or drainage still at work | Flexible sealant as a stopgap, and find the cause before a permanent repair |
| Many cracks crossing in a web or alligator pattern | Widespread slab or base failure, not one bad crack | Price a partial or full replacement instead of patching crack by crack |
| Crumbling edges, loose chunks, concrete falling apart at the crack | The concrete at the crack has lost strength | Cut back to solid concrete, then patch with a repair mix, not a thin sealant |
| Crack with water bubbling up, or damp ground beside it | Water is getting under the slab or draining toward it | Fix the drainage first, then repair, or the new seal will fail the same way |
Two more checks belong in this stage. First, look at where the crack runs. A crack that follows a straight line where a control joint should have been cut is less worrying than one that wanders diagonally across a slab, and a crack that starts at a corner or at a drain edge deserves a second look, since corners and edges carry load unevenly. Second, look at the ground beside the slab. Soil washed out from under an edge, a downspout dumping water right beside the crack, or a tree root lifting the slab all change the repair, and our guide on why water pools on a driveway helps you trace a wet patch back to its cause before you seal over it.
Why large cracks form in a driveway
Concrete cracks because it shrinks as it cures, expands and contracts with temperature, and moves with the ground beneath it, and a driveway crack turns large when water gets into a small crack, freezes and widens it, or washes support out from under the slab so one side settles. Most large cracks start small. They grow because nobody sealed the small version, and a winter or two of freeze and thaw did the rest.
Fresh concrete shrinks as it dries, which is why saw-cut control joints exist: they give the slab a planned place to crack. When a joint is cut too late, too shallow, or too far apart, the slab picks its own place instead, and that place is often a random line across the driving area. Heat adds movement on top of that. A slab in summer sun expands, and if there is no room at the joints, pressure builds until something gives. Then winter arrives, water sits in the crack, freezes, expands by roughly a tenth of its volume, and pries the crack wider. Each cycle repeats the damage, and that is how a hairline crack becomes a half-inch gap over a few winters.
Ground movement is the other half of the story. Soil that was not compacted well before the pour settles under load, and heavy vehicles parked in the same spot speed that up. Tree roots push from below. Water undermines from below too, when a gutter or downspout sends runoff beside the slab or when the ground slopes toward the driveway instead of away from it. This is also why cleaning reveals cracks so clearly: a pressure wash strips the packed dirt out of a crack and washes loose material from its edges, so a crack that looked like a dark line suddenly reads as a real gap. The wash did not break the slab. It showed you the slab as it already was, which is useful information, even if it is unwelcome on a Saturday morning.
Choose the right repair material
The right repair material for a large driveway crack is the one that matches the crack’s width, depth, and movement, not the one with the boldest label on the shelf. A flexible polyurethane sealant suits a crack that still moves, an epoxy suits a stable crack you want bonded solid, a cement-based patch suits a crumbling edge or a wide void, and a thin latex filler suits only small cracks, so using it on a large one is a short repair wearing a long label.
For most large driveway cracks, the workhorse is a self-leveling polyurethane sealant. It pours or guns into a horizontal crack, flows flat, and stays flexible after it cures, so it stretches when the slab moves in heat and compresses when it shrinks in cold. A non-sag polyurethane does the same job on a slope or a vertical face, like the side of a step, where a self-leveling product would run out. The Money Pit guide to repairing and sealing cracks in concrete notes that a polyurethane crack sealant can stretch a great deal without failing, and that its gray, textured finish is made to blend with surrounding concrete, which matters when the repair sits in the middle of a driveway you look at every day.
| Material | Best for | Flexibility | Watch out for |
|---|---|---|---|
| Self-leveling polyurethane sealant | Horizontal cracks a quarter inch to 1 inch wide, moving or stable | High, stretches and compresses with the slab | Needs a backer rod in deep cracks, and dry, clean sides to bond |
| Non-sag polyurethane sealant | Sloped cracks, step faces, vertical edges | High | Tool it promptly, since it skins over while you work |
| Two-part epoxy crack filler | Stable, dormant cracks you want bonded rigid | Low, rigid bond | Needs a fully dry crack, and it will crack again if the slab still moves |
| Cement-based patching mix | Crumbling edges, wide voids, broken corners, spalled areas | Low, rigid | Needs a bonding agent on old concrete, and it is not a flexing seal |
| Pourable latex crack seal | Small cracks up to about half an inch wide | Low to moderate | Thin for large cracks, and deep ones need repeat coats with a day between them |
One rule cuts through the shelf confusion: if the crack moves, use something flexible. If the crack is dead still and the edges are crumbling, use a patching mix that rebuilds the edge. If you are not sure whether it moves, the chalk marks from the reading stage will tell you, and while you wait for that answer, a flexible sealant is the safer guess, since a rigid fill in a moving crack simply cracks again, and then you are redoing the job with old filler in the way.
Tools and materials
You do not need a contractor’s trailer for this job, but a few specific items make the difference between a seal that bonds and one that peels. A wire brush and a shop vacuum matter more than the sealant brand, because sealant bonds to clean concrete and to nothing else. A backer rod matters more than a second tube of sealant, because it stops you pouring product into a bottomless crack and gives the seal its proper shape.
- Safety glasses, waterproof gloves, and a dust mask for cutting and grinding
- Cold chisel and hammer, or an angle grinder with a diamond blade for shaping edges
- Wire brush, stiff broom, garden hose or pressure washer on a low, wide setting, and a shop vacuum
- Foam backer rod in a diameter slightly larger than the crack width, plus a blunt tool to press it in
- Self-leveling polyurethane sealant or a patching mix, matched to the crack from the table above
- Standard caulk gun, utility knife, putty knife or margin trowel, and a pointing trowel for patches
- Concrete bonding agent if you are using a cement-based patch on old concrete
- Chalk, a ruler, and a straightedge for the reading stage
- Citrus-based cleaner or mineral spirits for wiping up uncured polyurethane, as the product label directs
Buy one more tube of sealant than your estimate says. A crack that looks shallow from the surface often runs deeper than you expect, and running out halfway down a crack leaves a joint in the seal that you will regret. The backer rod is the part most first-timers skip, so buy it in the same trip, in two diameters if the crack width varies along its length.
The repair, step by step
A lasting large-crack repair follows a fixed order: clean it out, shape the edges, set the backer rod, fill it in the right depth, tool it smooth, and leave it alone until it cures. Skipping the cleaning or the backer rod is the reason most DIY crack repairs fail within a year, and rushing the cure is the reason the rest fail within a week.
- Clear and clean the crack
Sweep the area, pull out weeds and loose chunks by hand, then scrub the crack with a wire brush and vacuum out the dust. Wash it with a hose or a pressure washer on a low, wide setting, and let it dry fully, since most sealants and all epoxies bond poorly to a wet or dusty surface. The Homes and Gardens guide to driveway crack repair makes the same point from the professional side: clean thoroughly, keep the pressure low and wide so you do not etch the concrete, and dry the crack before you fill it.
- Shape the edges
Use a chisel and hammer to widen the crack to at least a quarter inch and knock away crumbling concrete until you reach solid material. Aim for vertical sides, or a shallow inverted V, wider at the surface than at the bottom, which gives the filler something to grip. For a long or very ragged crack, an angle grinder with a diamond blade cuts a cleaner, straighter channel. Wear glasses and a mask for this step, and keep the grinder moving so you do not gouge one spot deeper than the rest.
- Check the depth and the sides
Probe the crack with a thin screwdriver or a wire. If the sides are still crumbling after shaping, cut back further until they are solid. If the crack runs all the way through the slab, that alone does not rule out a seal, but it does mean you need a backer rod, and it is worth checking whether the slab has settled, since a through crack with a lip is a leveling question, not a filling question.
- Set the backer rod
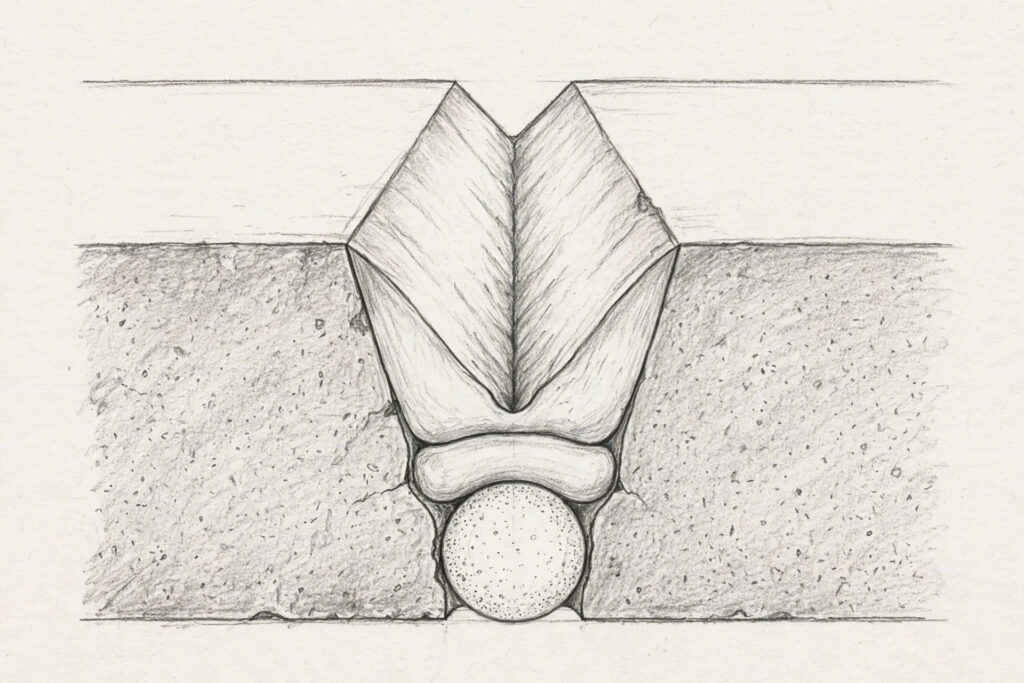
For any crack deeper than about half an inch, press a foam backer rod into the crack so the sealant layer above it ends up roughly a quarter to half inch deep. Size the rod slightly larger than the crack width so it wedges in snugly without stretching or tearing, and push it down with a blunt tool, not a sharp one that could puncture it. The Engineer Fix sealing guide explains why this matters: the rod stops the sealant bonding to the bottom of the crack, which would lock it on three sides and stop it flexing, and it leaves the sealant in an hourglass shape that can stretch properly.
- Fill with the sealant
Cut the nozzle at an angle to match the crack width, load the tube, and draw the gun slowly along the crack, forcing the bead deep into the channel and slightly overfilling it. For a self-leveling product, let it settle into the crack and top it up if it sinks. For a very deep crack, fill in layers rather than one thick pour, so air escapes and the seal cures evenly. If you are patching a crumbling edge with a cement mix instead, paint bonding agent on the old concrete first, let it go tacky, then press the mix in firmly with a trowel, working out air pockets.
- Tool it smooth
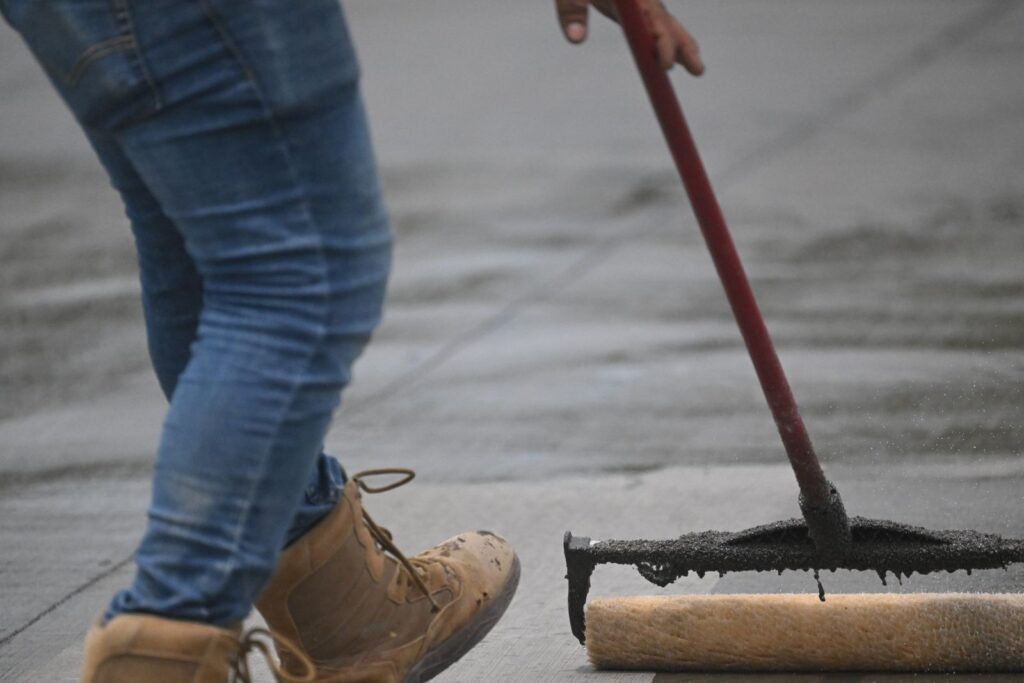
Right after placing the sealant, smooth it with a putty knife, a trowel, or a gloved finger, pressing it against both crack walls so it wets the sides fully. For a patch, level it with the surrounding slab and match the texture: a damp broom dragged lightly across a patch gives a non-slip finish close to a broomed driveway, while a smooth trowel finish suits a troweled slab. Wipe up excess sealant at once with a citrus cleaner or mineral spirits, as the product label directs, since cured polyurethane is much harder to remove from the surrounding concrete.
- Let it cure before traffic
Most polyurethane sealants go tack-free in about two hours in warm weather, but full cure takes longer, and driving over a fresh seal too soon can deform it. Keep cars off the repair for at least a day, and longer if the label says so or the weather is cool and damp. A patching mix needs its own cure time too, and keeping it damp for a few days in hot weather helps it cure strong rather than drying out and weakening.
- Inspect after the first rain
Once the seal has cured and rain has fallen, walk the repair and look for water sitting in it, sealant pulling away from one wall, or a new crack opening beside the old one. A small gap at one wall can be topped up with a fresh bead after cleaning. A seal that has pulled away along its whole length points to dirty or wet sides during application, and that section is better cut out and redone than patched over.
The diagram below shows the cross-section you are aiming for: shaped edges, a backer rod holding the seal at the right depth, and a band of flexible sealant sitting just below the slab surface, bonded to the two sides and to nothing at the bottom.
Tricky cases: wide gaps, broken edges, and sunken slabs
Not every large crack is a straight sealing job, and knowing which tricky case you have saves you from filling a crack that needed a different fix. A gap wider than an inch is past the range of a single sealant bead, and it usually wants a patching mix built up in layers, or a partial slab replacement if the edges are crumbling along the whole length. A broken corner or a chipped edge is a patching job, not a sealing job: cut a clean rectangle around the damage with a saw or grinder, remove the broken concrete, paint bonding agent on the old faces, and fill with a repair mix, then texture it to match.
A sunken slab is the case most worth getting right. If one side of the crack sits lower than the other, filler will not level the driveway, and it will not stop the trip hazard. That slab may be lifted by a professional process that pumps material underneath it, often called mudjacking or foam leveling, and the RUBI concrete driveway repair guide lists exactly this split: small cracks, minor flaking, and small sunken areas can be handled with patching or leveling, while deep interconnected cracking, major shifting, or concrete crumbling down to its base calls for replacement. If the slab has sunk because water washed the base away, fixing the water problem comes first, or the lifted slab will sink again.
One more tricky case is a crack that runs through a control joint that has lost its old sealant. Treat it like a joint, not a random crack: clean out the old material completely, set a backer rod, and seal it with a flexible product made for joints, since that line is supposed to move. Filling a working joint with a rigid patch locks it shut, and the slab will simply crack somewhere new to release the same pressure.
Curing, sealing, and the first rain
Once a large crack is repaired, the slab still needs time and a little protection before it is back to normal service. Sealant cure time depends on temperature, humidity, and depth, so follow the product label rather than a guess: polyurethane products are temperature sensitive, and the Money Pit guide warns against applying them below about 50 degrees Fahrenheit, since they will not cure properly in the cold. Plan the job for a dry stretch with mild temperatures, and keep the repair dry for the first day at least.
Sealing the whole driveway after repairs is a separate decision from sealing the crack itself, and it is worth making on purpose rather than by habit. A penetrating sealer over the full slab, applied after all repairs have cured, helps keep water and de-icing salts out of the surface, and it protects the new patch as well as the old concrete. Wait until the patch or sealant has fully cured before you seal over it, and check the sealer label for how long that wait should be, since sealing too early can trap moisture or stop a patch curing properly. If you are unsure about the seal-or-not call, our concrete driveway maintenance guide lays out the full seasonal routine, and sealing fits into that routine rather than replacing it.
The first rain after a repair is a useful test, not a threat. Watch whether water ponds on the repair, whether it runs along the crack line instead of across it, and whether the ground beside the slab stays wet. Ponding on the repair points to a low spot in the slab or a drainage problem that sealing alone will not fix, and that is the moment to read the pooling guide linked earlier before the next wet season does more damage than the last one.
Mistakes that shorten a repair
Most failed crack repairs fail for a handful of predictable reasons, and all of them are avoidable. Filling a dirty crack is the top one: dust, loose concrete, old sealant, and growth all stop the new material bonding, and the seal peels away from one wall within months. Pouring sealant into a deep crack with no backer rod is the second: the product sinks, the seal ends up too thick to flex, and you burn through tubes filling a void that foam would have filled for pennies. Using a rigid filler in a crack that still moves is the third, since the filler simply cracks again and leaves old material in the way of the proper fix.
Other mistakes are quieter. Applying sealant in cold or wet weather, or driving over it before it cures, weakens the bond. Smoothing a patch flush and shiny on a broomed driveway leaves a slick patch that stands out and can be slippery when wet. Ignoring the cause, like a downspout dumping water beside the slab or a root lifting it, means the next crack is already forming while you admire the last repair. And the most common mistake of all is waiting: a crack that is sealed at a quarter inch is a small job, while the same crack left through two winters can become a crumbling, settled problem that costs a slab section instead of a tube of sealant.
DIY or hire it out, and repair versus replace
A stable large crack with level sides is a solid DIY job for most homeowners with a free morning, a chisel, and a caulk gun. The work is not technically hard, and the materials are cheap compared with a contractor visit. The job stops being DIY when the slab has shifted, the crack is still growing, the damage covers a large part of the driveway, or the crack runs near a foundation wall where movement could mean something structural. In those cases a contractor or, for foundation questions, a structural engineer is the right call, and a filler tube is not a substitute for that assessment.
| Situation | Best route | Why |
|---|---|---|
| One or two stable cracks, sides level | DIY seal or patch | Straightforward work, low material cost, and you control the prep |
| Several large cracks, but the slab is sound | DIY, over a weekend | Same method repeated, with a full-slab seal afterwards if you choose |
| Sunken slab or a lip at the crack | Professional leveling assessment | Lifting a slab needs equipment and a check of the base underneath |
| Widespread web cracking or crumbling concrete | Replacement quote | Patching crack by crack will not restore a failed slab or base |
| Crack near a foundation wall, or a wall crack that mirrors it | Structural assessment first | Foundation movement needs diagnosis before any surface repair |
Repair, resurface, and replace are three different answers, and mixing them up wastes money. Repair means sealing or patching the crack itself, and it fits a slab that is otherwise sound. Resurfacing means coating the whole slab with a thin new layer, and it fits a slab with widespread surface wear but a solid base. Replacement means removing the slab and pouring new concrete, and it fits a slab that has failed structurally or lost its base. If you are weighing those options, a contractor quote for each one, on the same slab, is more useful than a general price guess, since the right answer depends on how much of your driveway is actually damaged. If you do hire the work out, the same diligence applies as for any exterior contractor: our guide on questions to ask a pressure washing company is about washers, but its core habit transfers well, namely asking what method, what material, and what happens if the repair fails, before anyone starts work.
Keeping the repair fixed
A repaired crack stays repaired when water stops getting under the slab and the slab stops moving more than it has to. Keep joints sealed, since an open joint is the next crack waiting for winter. Keep water moving away from the driveway: clean gutters and downspouts, extend downspouts away from the slab edge, and regrade any soil that slopes toward the concrete. Keep heavy loads in mind: a delivery truck or a skip parked on a thin or already cracked slab can finish damage that a car never would, so keep the heaviest traffic on the strongest part of the drive where you can.
Walk the driveway twice a year, in spring and in autumn, and look at every repair and every joint with fresh eyes. Spring shows you what winter did, and autumn is your last good window to seal before the cold returns. A small gap at a repair edge, caught in autumn, is a ten-minute top-up. The same gap found in spring, after a winter of water and ice, can be a full redo. That twice-yearly habit is the whole maintenance routine in miniature, and the concrete driveway maintenance guide plus the wider driveway cleaning guide cover the seasonal jobs around it, from washing to sealing, so the crack repair is one part of a slab that is looked after, not a one-off rescue.
Frequently asked questions
Yes, if the crack is stable, the sides are level, and the slab has not sunk. Clean it out, shape the edges, set a backer rod where it runs deep, and fill it with a flexible polyurethane sealant or a patching mix. Get a professional assessment first if one side sits higher than the other, the crack keeps growing, or the damage is widespread.
For most large cracks, a self-leveling polyurethane sealant over a backer rod is the best choice, since it stays flexible as the slab moves with temperature. A rigid epoxy suits only a stable, non-moving crack, and a cement-based patching mix suits crumbling edges or wide voids that need rebuilding rather than sealing.
Yes, for any crack deeper than about half an inch. The rod stops sealant sinking into a bottomless crack, sets the seal at the right depth, and stops the sealant bonding to the bottom, which would lock it on three sides and stop it flexing. Without it, the seal is too thick, wastes product, and fails sooner.
Width alone does not decide that. A stable crack up to about an inch wide can usually be sealed or patched if the slab is sound. Replacement becomes the sensible answer when cracks form a web across the slab, one side has shifted badly, the concrete is crumbling to its base, or the base underneath has failed.
The usual reasons are a dirty or wet crack at application, no backer rod in a deep crack, a rigid filler used in a crack that still moves, or water still getting under the slab from poor drainage. Cut out the failed section back to clean, solid concrete and redo it with the right material, and fix the drainage cause at the same time.
Keep cars off a sealant repair for at least a day, and longer if the label says so or the weather is cool and damp. Most polyurethane sealants go tack-free in about two hours in warm weather, but tack-free is not fully cured, and driving over a fresh seal too soon can deform it before it sets.
Sealing the full slab after repairs have cured helps keep water and salts out, and it protects the new work along with the old concrete. Wait until every repair has fully cured, check the sealer label for the waiting time, and do not seal over a patch that is still curing or a crack that is still moving.
Sources
Methods, depth rules, and cure guidance in this article follow the guides actually opened during research: the Money Pit guide to repairing and sealing cracks in concrete, the Engineer Fix guide to sealing concrete cracks, the Homes and Gardens guide to driveway crack repair, and the RUBI concrete driveway repair guide. Where those guides differ on a detail, this article follows the more conservative practice and says so.

3 Comments
Pingback: Driveway Cleaning Guide: Concrete, Asphalt, and Pavers
Pingback: Concrete Driveway Maintenance Guide: Clean, Seal & Repair
Pingback: How to Cut Pavers: Wet Saw, Grinder & Splitter Compared