


Siding cleaning means matching the cleaning method to the material on your wall, not to the dirt on it. The same green film that a soft brush and soapy water lifts off vinyl can take the paint off wood siding, and the pressure that barely touches brick can crack a fiber cement board or force water behind a vinyl panel. So the right question is never just how to clean siding. It is how to clean your siding, the kind you actually have. This guide gives you that answer material by material: vinyl, fiber cement, wood, aluminum and steel, brick, and stucco, with the pressure limit, the cleaner, and the mistakes to avoid for each one.
Most houses need their siding washed about once a year. Homes in shade, near trees, or in humid and coastal areas usually need it twice. A wash is also the cheapest inspection you will ever do, because clean siding shows you the cracked panel, the loose board, and the soft spot you could not see under a year of grime. For the bigger picture, our exterior house cleaning guide by surface covers the whole outside of the house, and this guide goes deep on siding alone.
On This Page
- Which Cleaning Method Does Your Siding Actually Need?
- Siding Cleaning at a Glance: Method, Pressure Limit, and Cleaner by Material
- What Is That Stain on Your Siding?
- Vinyl Siding: The Short Version
- Fiber Cement Siding: Follow the Manufacturer’s Numbers
- Wood Siding: Gentle, and Dry When You Finish
- Aluminum and Steel Siding: Dents Before Dirt
- Brick Siding: Gentlest Method First
- Stucco: The Hose Is the Tool
- Choosing a Cleaner: Soap, Vinegar, Oxygen Bleach, Chlorine Bleach
- DIY or Hire a Pro?
- Safety Before You Start
- Frequently Asked Questions
- Sources
Which Cleaning Method Does Your Siding Actually Need?
There are three ways to clean siding, and the material picks the method, not you. Hand washing uses a bucket, a soft brush, and a garden hose, and it is the safest option for every material on this page. Soft washing uses low-pressure water, roughly 40 to 200 PSI, to apply a cleaning solution that kills algae, mold, and mildew at the root, then rinses it away. Pressure washing uses force to blast dirt off the surface, and it is the method that causes most DIY siding damage. Soft washing treats the growth, so the wall stays clean longer. Pressure washing only removes the top layer, so the green comes back sooner.
| Method | How it works | Best for | Watch out for |
|---|---|---|---|
| Hand wash | Bucket, soft brush, garden hose | Every material; small areas and spot stains | Slow on a big house; needs a ladder for upper walls |
| Soft wash | Low pressure plus a cleaning solution, dwell, rinse | Vinyl, fiber cement, wood, aluminum, stucco, painted siding | Solution must not dry on the wall; protect plants |
| Pressure wash | High-pressure water blasts dirt off | Brick, and vinyl or fiber cement within strict limits | Cracks panels, strips paint, forces water behind laps |
If you take one rule from this guide, make it this one: start with the gentlest method that works, and only step up when the dirt proves you need to. A garden hose and a brush handle most siding jobs. A soft wash handles the rest. A pressure washer is the last resort, not the first tool you reach for. Our soft washing vs. pressure washing by surface guide walks through the same choice for roofs, decks, and driveways.
One more thing before the per-material detail. Never aim a spray upward at siding. Panels overlap like shingles, and water driven up under a lap goes straight into the wall cavity, where it feeds hidden mold. Spray level or downward, keep the nozzle moving, and keep it at least 12 to 18 inches from the wall.
Siding Cleaning at a Glance: Method, Pressure Limit, and Cleaner by Material
Use this table to find your material and start there. The pressure figures are ceilings, not targets. Staying well under the limit is always fine, and on most materials the hose and brush do the job without any pressure at all.
| Material | Best method | Max pressure | Go-to cleaner | Biggest risk |
|---|---|---|---|---|
| Vinyl | Hand wash or soft wash | 1,500 PSI, 40-degree tip, level spray only | Mild dish soap; 30% vinegar mix for mildew | Water forced behind panels; cracked panels in cold weather |
| Fiber cement | Hand wash or soft wash | 1,500 PSI per James Hardie, 40-degree tip, 6 ft back | Mild dish soap; Jomax or Mildew Check for mildew | Stripped ColorPlus finish; voided warranty |
| Wood | Hand wash or soft wash | 600 PSI, soft wash preferred | Oxygen bleach solution | Rot, warping, and paint failure from trapped moisture |
| Aluminum and steel | Hand wash or soft wash | Soft wash only | Mild soap and water | Dents; chalky oxidation if scrubbed hard |
| Brick | Hand wash, pressure with care | 100 to 400 PSI, 25 to 60-degree fan, 2 ft back | Water first; mild masonry cleaner for stubborn stains | Damaged mortar; salt stains from the wrong cleaner |
| Stucco | Garden hose only | No pressure washer | Mild, water-soluble cleaner | Water forced into cracks; damaged finish |
Two notes on the numbers. First, the fiber cement limit is the manufacturer’s own figure, and some contractor guides use 1,200 PSI as a more cautious ceiling. Either way, the point stands: fiber cement is a low-pressure job, and a standard 2,500 to 4,000 PSI homeowner machine will damage it if you open it up. Second, the vinyl limit comes with a warning from the makers themselves. CertainTeed, one of the largest vinyl siding manufacturers, does not recommend power washing its siding at all. If your panels are older or brittle, take that advice and wash by hand.
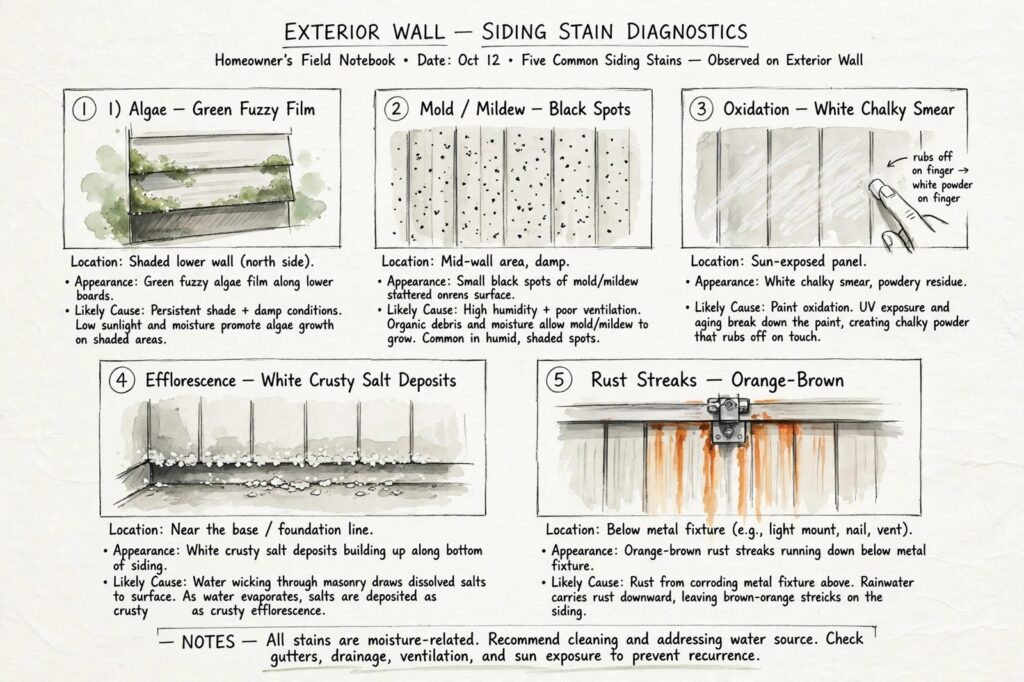
What Is That Stain on Your Siding?
Cleaning the wrong stain with the wrong cleaner wastes an afternoon and can set the stain deeper. So before you mix anything, name what you are looking at. Most siding stains are one of five things, and each one points to a different cause and a different fix.
| What you see | What it usually is | Where it shows up | Clean it with |
|---|---|---|---|
| Green, fuzzy film | Algae | Shaded north walls, low and damp areas | Soft wash with diluted bleach or oxygen bleach; rinse well |
| Small black spots | Mold or mildew | Damp mid-wall areas, near plants and sprinklers | Vinegar mix on vinyl; oxygen bleach on wood and fiber cement |
| White chalky film that rubs off on your finger | Oxidation | Sun-beaten vinyl and aluminum | Gentle wash; no harsh scrubbing or pressure |
| White crusty salt deposits | Efflorescence | Brick and stucco near the ground | Dry brush first, then water; never acid on a whim |
| Orange-brown streaks running down | Rust | Below nails, light mounts, vents, and gutters | Oxalic-acid rust remover made for siding; fix the metal source |
The two that get mixed up most are algae and mold. Algae is green and fuzzy, and it loves shade and damp. Mold and mildew show as small black spots, and they show up wherever moisture lingers. If the green is on vinyl, our guide to removing green algae from vinyl siding walks through the safe method step by step. If the spots are black, read our guide to black spots on vinyl siding first, because artillery fungus looks similar and needs a different approach. And if the white film rubs off chalky on your finger, it is oxidation, not dirt, so run our oxidation vs. dirt test before you pick a cleaner. Washing oxidation like dirt just smears it around.
Vinyl Siding: The Short Version
Vinyl is the most common siding in the US and the most forgiving to clean, as long as you respect two rules: wash level or downward, and keep the pressure low. The industry guidance, published by the Vinyl Siding Institute and reproduced in Norandex’s vinyl siding care and maintenance guide, is simple. Use a soft cloth or a long-handled soft-bristle brush with mild soap and water. For general dirt, mix a quarter cup of dish soap into four gallons of water. For mildew, use a mix of 30 percent white vinegar and 70 percent water. Spot check any cleaner on a hidden section first, and rinse before the soap dries, or it will leave marks.
Keep these cleaners away from vinyl: organic solvents, undiluted chlorine bleach, liquid grease remover, nail polish remover, and furniture polish. They can damage the surface. A pressure washer can be used with caution, with the stream at eye level and pointed straight at the siding, never upward. But check your manufacturer first, because some do not allow it at all, and improper pressure washing can void the warranty. If you want the full method, with recipes for every stain and the pressure-washer warnings in detail, read our how to clean vinyl siding guide. That article is the vinyl deep dive. This one stays at the level of choosing between materials. If you are still deciding whether vinyl is right for your house at all, our guide to what vinyl siding is covers the types and how it protects a home, and our vinyl siding lifespan guide sets out how long it lasts by climate and care.
Fiber Cement Siding: Follow the Manufacturer’s Numbers
Fiber cement, usually sold as James Hardie siding, is a mix of cement, sand, and cellulose fiber with a factory paint finish, and it cleans more like painted wood than like vinyl. James Hardie says to wash it every six to 12 months, and the company’s own maintenance guidance, reproduced in a Habitat for Humanity chapter guide, spells out the method: wash down with a garden hose, then gently clean with a soft brush or a wet soft cloth, moving side to side in the direction of the planks. Work in small sections from the top down so dirty water does not streak the clean area below.
If you use a pressure washer, the limits are exact. Stay below 1,500 PSI, use a wide fan tip, keep at least six feet from the wall, and spray straight on or slightly downward, never upward under the laps. Acid washing is not recommended, and neither are abrasive cleaners, solvents, or wire brushes. For mildew, James Hardie names the commercial cleaners Jomax and Mildew Check. Damage from improper cleaning may not be covered by the warranty, and that warranty is worth protecting: Hardie siding carries a 30-year limited warranty, with a 15-year warranty on the ColorPlus factory finish. A cheap wash that strips the finish is the most expensive wash you will ever do.
Wood Siding: Gentle, and Dry When You Finish
Wood siding asks for the gentlest approach on this page, because the risk is not cosmetic. Water that sits in wood feeds rot, warping, and paint failure, and those problems cost far more than a dirty wall. Hand washing or a soft wash is the right call. If you do use a pressure washer, stay at or below 600 PSI and keep the nozzle moving. A garden hose and a soft brush handle most wood siding jobs, and they are the safer choice on older boards.
For cleaners, oxygen bleach is the workhorse on wood. It lifts algae and mildew without the fiber damage chlorine bleach can cause, and it is kinder to the plants below the wall. Mix it per the label, apply it with a pump sprayer or brush, let it dwell for 10 to 15 minutes without drying, scrub lightly, and rinse from the top down. Then let the wall dry fully. Wood siding needs 48 to 72 hours of dry weather after a wash before you even think about paint or stain, and washing late in the day on a humid week can leave boards damp overnight. Pick a dry, mild day, and start early so the sun does the drying.
Check the wall as you wash. Soft spots, boards that flex under the brush, and paint that peels in sheets are signs of rot or a failing finish, not dirt. Cleaning will not fix those, and pressure will make them worse. Note them, let the wall dry, and deal with the repair before the next wash.
Aluminum and Steel Siding: Dents Before Dirt
Aluminum and steel siding clean easily, and that is the trap. The panels dent under pressure that vinyl would shrug off, and a narrow spray tip can leave a permanent dimple. So this is a soft wash only material. A bucket of mild soap and water with a soft brush takes care of ordinary dirt, and a soft wash handles algae and mildew. Never use a pressure washer on aluminum, and keep wire brushes and abrasive pads far away from it.
Aluminum has one quirk of its own: oxidation. Years of sun break down the surface into a chalky white film that rubs off on your hand. It looks like dirt, but washing it like dirt does not work, and scrubbing hard only spreads the chalk and dulls the finish. Wipe a finger across the panel first. If it comes away white and powdery, that is oxidation. Our guide to why vinyl siding looks chalky explains the same chalking process on vinyl, and the oxidation test there works on aluminum too. A gentle wash with a mild cleaner is the right response. If the chalking is heavy and the color underneath has faded badly, the honest fix is new paint, not a stronger cleaner.
Steel siding is tougher than aluminum, but it rusts where the coating is scratched or cut. Check the bottom edges and anywhere a ladder or trim has scraped the finish. Touch up bare spots with matching paint after the wash, before rust gets a hold.
Brick Siding: Gentlest Method First
Brick looks indestructible, and that is exactly why people damage it. The brick is hard, but the mortar between the bricks is not, and a tight pressure stream cuts mortar joints like a knife. Meridian Brick’s cleaning guide, which follows the Brick Industry Association’s Technical Note 20, states the rule plainly: use the gentlest effective method first. Start with a bucket and a brush. Test any cleaner on a small, hidden area. Pre-soak the wall with water before you apply a cleaner, and never let the cleaner dry on the brick.
If the bucket and brush do not do it, pressure is allowed, but only within narrow limits: 100 to 400 PSI, a 25 to 60-degree fan nozzle, and at least two feet from the wall. That is far below what a standard pressure washer puts out, so turn the machine down or use a low-pressure tip. Never use unbuffered muriatic acid on brick. It can burn the surface, stain it, and weaken the mortar, and on some brick it leaves damage you cannot undo. Coated or painted brick is a different job again: no high pressure at all, because the coating will peel.
White crusty deposits on brick are efflorescence, salts drawn out of the masonry by water. Dry-brush the salts off first, then wash with water. The salts will keep coming back until the water source is fixed, which is usually a gutter or grading problem above the wall. Chasing efflorescence with stronger chemicals treats the symptom and ignores the cause.
Stucco: The Hose Is the Tool
Stucco is the surface where a pressure washer does the most damage the fastest. The Stucco Manufacturers Association’s maintenance guide does not include a pressure washer in its method at all. Its method is a garden hose: pre-wet the wall from the bottom up, then direct a stream of water against the wall from the top down to carry the dirt off. Caked-on dirt may need a brush. Mild, water-soluble cleaners handle stains, as long as they will not attack the portland cement, lime, or oxide pigments that color the finish. Finish with a full rinse, and keep shrubs and plants shielded from any chemicals.
The association also names the best long-term stucco cleaning strategy, and it is not washing. It is gutters and downspouts. Properly routed roof drainage is the best way to prevent the staining and efflorescence that make stucco look dirty in the first place. If your stucco streaks below the roofline every rainy season, the fix is in the drainage, not the detergent. Also worth knowing: keep sprinklers aimed away from stucco walls. Constant wetting is what grows the mildew you are trying to wash off. And if your stucco is EIFS, the synthetic foam-backed kind, treat it like stucco and keep pressure away from it, because water forced behind EIFS is a much bigger repair.
Choosing a Cleaner: Soap, Vinegar, Oxygen Bleach, Chlorine Bleach
There is no single best siding cleaner. The right cleaner depends on the stain and the material, and the wrong one can damage the wall or the plants below it. Here is how the four common options compare.
| Cleaner | Good for | Do not use on | Notes |
|---|---|---|---|
| Mild dish soap | General dirt on every material | Nothing, at label strength | A quarter cup per four gallons of water; rinse before it dries |
| White vinegar, 30% mix | Light mildew on vinyl | Do not use on brick or stone; acid can mark masonry | 30% vinegar, 70% water; spot check first |
| Oxygen bleach | Algae and mildew on wood, fiber cement, vinyl | Nothing common, at label strength | Plant-safe, breaks down in soil; needs 10 to 15 minutes of dwell time |
| Chlorine bleach, diluted | Established mildew on vinyl and painted surfaces | Never undiluted; never on wood; never mix with anything | About a third of a cup per gallon at most; wet plants first, rinse them after |
Start with soap. It handles plain dirt, pollen, and dust on every material, and most siding never needs anything stronger. Step up to vinegar or oxygen bleach when you see green or black growth. Reach for diluted chlorine bleach only for established mildew on vinyl or painted surfaces, and keep it diluted: about a third of a cup per gallon of water, never straight from the jug. Wet the plants below the wall before you start and rinse them again when you finish, because bleach runoff burns leaves.
Two rules that are not negotiable. First, never mix bleach with ammonia, vinegar, or any other cleaner. The fumes can injure you. Second, the EPA’s mold guidance makes a point worth remembering: bleach is not the routine answer to mold. Scrubbing with detergent and water and drying the area completely matters more than the cleaner you pick, and dead mold can still trigger allergies, so physical removal is the point. The Iowa State University Extension service gives the same practical advice in its house siding cleaning guide: mild soap, a soft brush, and a rinse, with stronger cleaners only for the stains that need them.
DIY or Hire a Pro?
Most single-story siding washes are honest DIY jobs. A bucket, a brush, and a hose will get you there in an afternoon, and you will see the condition of your siding up close. But there are clear lines where a pro is the better call.
| Situation | DIY or pro | Why |
|---|---|---|
| Single story, sound siding, light dirt or algae | DIY | A hose and brush handle it safely |
| Two or three stories | Pro | Ladder work at height plus a wet wall is a fall risk |
| Stucco or EIFS, or old and brittle siding | Pro | One wrong pass with pressure causes real damage |
| Mold covering more than about 10 square feet | Pro | The EPA’s mold guidance uses 10 square feet as the rough line for calling in help |
| Home built before 1978 with old paint | Pro, or follow lead-safe rules | Old paint may contain lead; do not dry-scrape or pressure-blast it |
| Siding is cracked, loose, or soft | Repair first, then clean | Cleaning damaged siding hides the problem and can make it worse |
When you do hire, ask what method they use and what pressure they run. A company that soft washes, names its cleaner, and can tell you the pressure limit for your material is a company that knows the work. A company that promises to blast everything at full pressure is a company to skip. If your home was built before 1978, ask about lead-safe practices before any work starts. The EPA’s lead-safe guidance for DIYers sets out the precautions, and a good pro will already follow them.
Safety Before You Start
Siding cleaning looks harmless, and most of the injuries come from the two things people forget: ladders and pressure. A few habits cover most of the risk.
Set the ladder on firm, level ground, with the base one foot out for every four feet of height, and make sure the side rails extend at least three feet above the landing you step onto. That three-foot rule comes from OSHA’s ladder standard, 29 CFR 1926.1053, and it exists because most ladder falls happen at the step on and off. Keep three points of contact, never stand on the top three rungs, and never lean sideways to reach a far patch. Move the ladder instead. Wet siding is slippery, so wear shoes with grip, and keep the hose where it cannot trip you.
For the pressure washer, wear eye protection and closed shoes, and treat the spray with respect. A narrow tip at close range can cut skin, and the recoil can throw you off balance on a ladder, which is another reason pressure washing from a ladder is a bad idea. Keep the spray away from windows, doors, vents, and electrical fixtures, and never spray toward people or pets. If you are using bleach, wear gloves and eye protection, work with the wind at your back, and keep the mix off your skin and clothes.
Frequently Asked Questions
About once a year for most homes. Wash twice a year if your house sits in shade, near trees, or in a humid or coastal area, where algae and mildew grow faster. Fiber cement makers suggest every six to 12 months, which is a good rhythm for any material.
There is no single best cleaner. Mild dish soap and water handles ordinary dirt on every material. A 30 percent vinegar mix handles light mildew on vinyl. Oxygen bleach is the safest choice for algae and mildew on wood and fiber cement. Diluted chlorine bleach is a last resort for established mildew on vinyl, never undiluted and never mixed with anything else.
With caution, yes, but many manufacturers say not to. CertainTeed does not recommend power washing its vinyl siding. If you do use one, stay at or below 1,500 PSI with a 40-degree tip, hold it at eye level, spray straight or downward, never upward, and keep it 12 to 18 inches from the wall. A garden hose and a brush are safer and usually enough.
It depends on the material. Vinyl: 1,500 PSI maximum. Fiber cement: 1,500 PSI maximum per James Hardie, with a 40-degree tip and six feet of distance. Wood: 600 PSI maximum, soft wash preferred. Aluminum and steel: soft wash only, no pressure washer. Brick: 100 to 400 PSI. Stucco: no pressure washer at all, garden hose only.
Yes, and for most materials it is the better way. A garden hose, a bucket of soapy water, and a soft-bristle brush handle dirt, pollen, algae, and light mildew on every siding type. A pump sprayer lets you apply a cleaning solution without any pressure at all.
Apply a diluted bleach or oxygen bleach solution with a pump sprayer or brush, let it dwell for 10 to 15 minutes without drying, scrub lightly, and rinse from the top down. Soft washing kills the algae at the root, so it stays away longer than pressure washing, which only blasts the surface layer off.
Hire a pro for two or three-story homes, stucco or EIFS, old or brittle siding, mold covering more than about 10 square feet, and any home built before 1978 where old paint may contain lead. A single-story wash on sound siding is a reasonable DIY job.
Sources
- Norandex, “Vinyl Siding Care and Maintenance,” reproducing the Vinyl Siding Institute’s cleaning guidance. Soft cloth and brush method, soap and vinegar recipes, cleaners to avoid, and pressure washer cautions.
- CertainTeed, “How to Clean Vinyl Siding.” Cause-by-cause cleaning advice, the mildew recipe, and the manufacturer’s stance on power washing.
- James Hardie, “Best Exterior Siding Materials.” Wash fiber cement siding every six to 12 months; 30-year siding warranty and 15-year ColorPlus finish warranty.
- James Hardie fiber cement siding maintenance guidance, reproduced by Habitat for Humanity of East Jefferson County. Hose and soft brush method, under-1,500-PSI limit with a wide fan tip at six feet or more, no acid wash, and the warranty warning.
- US Environmental Protection Agency, mold guidance. Scrub with detergent and water, dry completely, and do not rely on bleach as a routine mold cleanup.
- Meridian Brick, “Cleaning Masonry,” following Brick Industry Association Technical Note 20. Gentlest-method-first rule, 100 to 400 PSI with a fan nozzle at two feet or more, and no unbuffered muriatic acid.
- Stucco Manufacturers Association, “Three Coat Stucco Maintenance Guidelines.” Garden-hose method, mild cleaners, plant protection, and gutters and downspouts as the best stain prevention.
- Iowa State University Extension, “Cleaning Your House Siding.” Mild soap, soft brush, and rinse, with stronger cleaners only for stains that need them.
- Mr. Handyman, “How to Clean Siding Without Damaging It.” Material-by-material pressure limits and the pressure wash vs. soft wash comparison.
- US Environmental Protection Agency, “Lead-Safe Renovations for DIYers.” Precautions for homes built before 1978 where old paint may contain lead.
Last updated: November 7, 2026

2 Comments
Pingback: How to Clean Vinyl Siding Safely: Dirt, Mold & Stains
Pingback: Exterior House Cleaning Guide by Surface | Home Exterior Lab