


If your gutters drip from behind instead of draining out the downspout, the most likely culprit is a missing or badly placed drip edge, the thin metal flashing meant to carry roof water into the gutter. The runner-up is a gutter hung too low or pitched the wrong way, which lets water slip in behind it. Both are fixable, and you can figure out which one you have in about fifteen minutes with a ladder and a garden hose.
Keep reading for the symptom map, the 15-minute diagnosis, and the exact fix for each cause.
Last updated: October 14, 2026
Table of contents
- Read the pattern first: the drip tells you the cause
- What the drip edge and fascia board actually do
- The six causes, ranked by how often they show up
- The drip-edge mistake, up close
- Diagnose it yourself in fifteen minutes
- Fix one: slip in a drip-edge extension or gutter apron
- Fix two: re-pitch the gutter and tighten the hangers
- Fix three: reseal corners and end caps, and clear the path
- Fix four: deal with rotted fascia or a soft roof deck
- Do it yourself, or call a pro? The honest line
- Frequently asked questions
- Sources
Read the pattern first: the drip tells you the cause
Water dripping behind a gutter points to one of six causes, and the pattern narrows it quickly. A steady drip along the whole run means a missing or short drip edge. Drips near a corner usually mean the gutter sits too low or the pitch is wrong. Match what you see to the table below first.
| What you see | Most likely cause | 60-second check | First fix |
|---|---|---|---|
| Thin, steady drips from behind the gutter along most of the run; fascia stays damp between rains | Missing or short drip edge | Crouch under the eave and look up: does the shingle edge pour straight past the gutter, with no metal lip reaching into the trough? | Slip a drip-edge extension or gutter apron under the shingles so it drops inside the gutter |
| Water pours behind the gutter near one corner or one end | Gutter hung too low at that end, or the pitch runs the wrong way | Sight along the back edge of the gutter from the end. If water sits in the trough instead of moving toward the downspout, the slope is off | Loosen the hangers and reset the pitch to about a quarter inch of drop per ten feet toward the downspout |
| Drips in a few spots with a visible gap between the gutter back and the fascia | Loose or failing hangers letting the gutter pull away | Tug the gutter gently outward. If it flexes away from the fascia or a hanger wiggles, the gutter has drifted | Tighten or replace the hangers and pull the gutter back snug to the fascia |
| Water sheets off the roof and misses the gutter entirely, mostly in heavy rain | Shingles overhang too far past the roof edge, or no gutter apron to bridge the gap | Look at where the shingle ends meet the gutter from a ladder. If roof water launches past the trough, the overhang is the problem | Install a gutter apron to catch the sheet flow and drop it into the gutter |
| Dark stains or green streaks on the fascia, worse on shaded or low-slope sections | Capillary action wicking water under the shingle edge and behind the drip edge | Check the shaded side of the house first. Staining that creeps upward from the roof edge points to wicking, not splashing | Extend the drip edge so it reaches well into the gutter, about three quarters of an inch |
| Paint peeling or bubbling on the fascia, wood feels soft when you poke it | Rotted fascia or roof deck from water getting behind the gutter over time | Press a screwdriver gently into the fascia. If it sinks in, the wood is rotting | This is carpentry work: cut out and replace the rotted boards, then fix the drip edge or pitch that caused it |
That table is worth more than a generic cause list, because back-of-the-gutter leaks hide. A troubleshooting table for water drops on the bottom of a gutter points to installation mistakes or a missing drip edge when the fascia stains, and a cause-and-solution quick reference for rain running behind gutters lands in the same place. The pattern you see is the diagnosis; the fix follows from it.
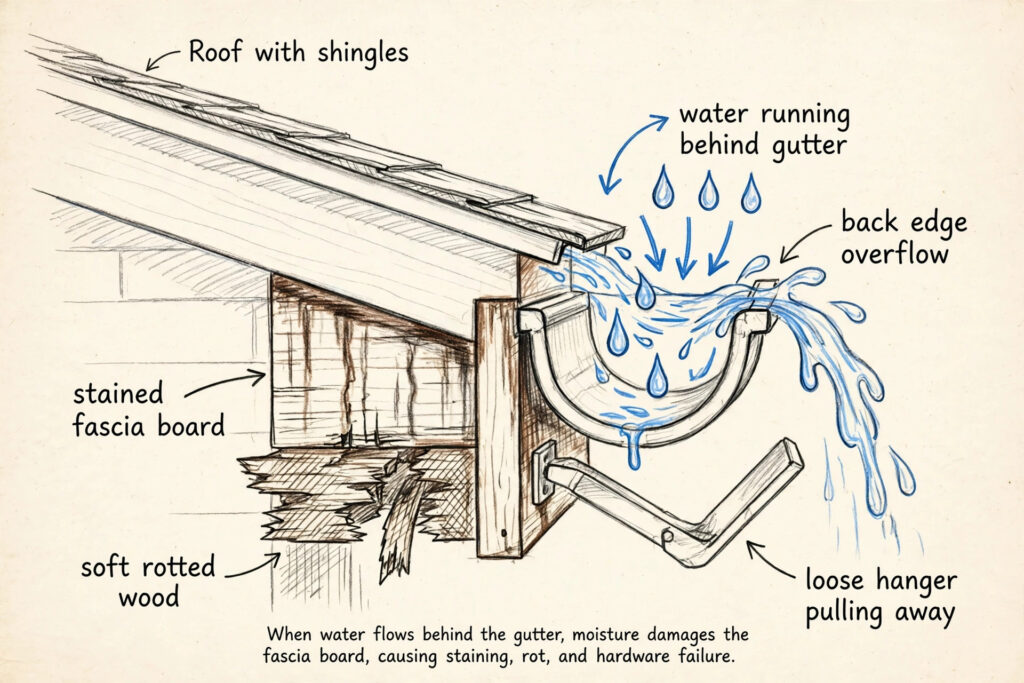
I have walked up to houses where the gutters looked fine from the street, straight runs, fresh paint, no sag, and the fascia behind them was quietly going soft. That is what makes this problem sneaky. The gutter can look perfectly healthy while water chews on the wood behind it, so spend five minutes watching the drip before you touch anything.
What the drip edge and fascia board actually do
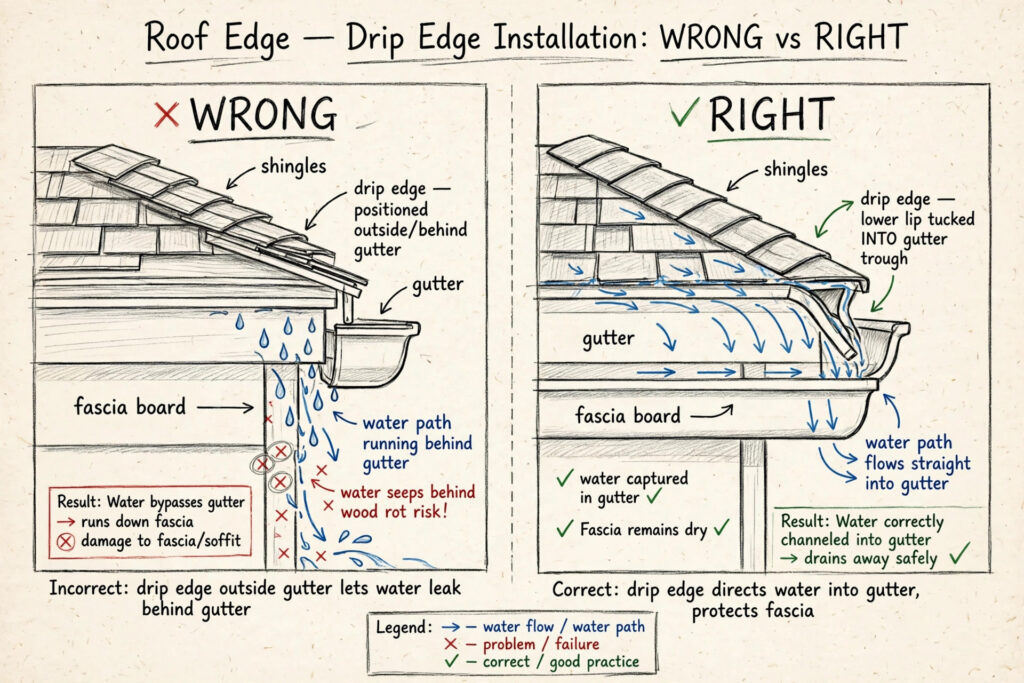
A drip edge is a strip of flashing nailed along the roof edge under the shingles; it kicks water past the fascia and into the gutter. The fascia board is the trim the gutter hangs from. If the drip edge is missing, or sits outside the gutter, water slides down the fascia instead of landing in the trough.
A few more parts of this puzzle, since the names get mixed up. The soffit is the flat underside beneath the eave, the part you see when you stand under the roof edge and look up. The roof deck is the plywood or boards the shingles sit on. The starter shingle is the first course at the eave, and it should hang no more than about a quarter inch past the drip edge. The ice-and-water shield, the sticky membrane on the deck near the eave, should lap over the top of the drip edge, not under it, according to an inspection guide by Daniel Friedman, who has spent more than four decades inspecting roofs. That same guide recommends nailing the drip edge to the sheathing every 18 to 24 inches, which tells you how seriously the fastening matters.
Hidden hangers, the brackets that clip inside the gutter and screw to the fascia, are what hold most modern gutters up. When they loosen, the whole run can drift away from the fascia just enough to open a gap for water. Spikes and ferrules, the older style, do the same job with a long nail through the gutter face, and they loosen with freeze and thaw.
The six causes, ranked by how often they show up
Most cases of water dripping behind a gutter trace back to six causes: a missing or short drip edge, a drip edge sitting outside the gutter, a gutter hung too low, wrong pitch, loose hangers, and clogs forcing water over the back edge. The table shows how to tell them apart.
| Cause | How to recognize it | Who can fix it | How urgent |
|---|---|---|---|
| Missing or short drip edge | Drip runs the full length of the eave; no metal visible between shingle edge and gutter | Careful DIY on a one-story eave | High: every rain soaks the fascia |
| Drip edge tucked behind the gutter instead of inside it | Drip along the run even though a drip edge exists; metal disappears behind the gutter back | Careful DIY on a one-story eave | High: same soaking, hidden from view |
| Gutter hung too low | Water pours behind the gutter near the high end or a corner; trough looks undersized for the roof | DIY for a short run; pro for long runs | Medium-high: localized rot risk |
| Wrong pitch (level or sloping away from the downspout) | Standing water in the trough; drips where water ponds | DIY for a short run; pro for long runs | Medium: gets worse as hangers loosen further |
| Loose hangers pulling the gutter away from the fascia | Visible gap between gutter back and fascia; gutter flexes when tugged | DIY on a one-story house | Medium: gap grows over time |
| Clogs or a blocked downspout forcing water over the back edge | Problem appears or worsens in heavy rain; debris visible at the roof edge | DIY on a one-story house | Medium: clean first, then reassess |
Clogs deserve a special mention because they mimic every other cause on this list. A gutter choked with leaves fills up in a downpour and spills over the back edge, which looks exactly like a drip-edge problem from the ground. If the leak only shows up in heavy rain, read the walkthrough of why gutters overflow in heavy rain before you buy any flashing. For the routine side of it, here is how often gutters actually need cleaning, and the early signs of a clogged downspout, so you can rule clogs out in one ladder trip.
The drip-edge mistake, up close
A drip edge only works if its bottom lip hangs inside the gutter trough and its vertical leg stands about a quarter inch off the fascia. Nailed flush to the fascia, water clings to the metal by capillary action and slides behind the gutter. Skipped entirely, water pours off the shingle edge straight down the fascia board.
Capillary action is the quiet villain here. Water clings to surfaces, and in a narrow gap, like between a drip edge nailed flat against the fascia, surface tension can pull water sideways and even slightly uphill. That is why the quarter-inch gap matters: it breaks the bridge the water would travel on. A gutter leak repair reference notes that on low-pitch roofs this wicking can pull water under the shingles and past the drip edge entirely, and it suggests a gutter apron as the fix for exactly that situation.
The classic installation blunder looks innocent. A roofing short from Sunrise Roofing shows it in a few seconds: the drip edge tucked behind the gutter’s back edge instead of inside the trough. From the ground, everything looks finished. But rain follows the metal straight past the gutter and down the fascia, which is precisely the “water dripping behind my gutters” complaint. The metal is there; it is just on the wrong side of the one place it needed to be.
Diagnose it yourself in fifteen minutes
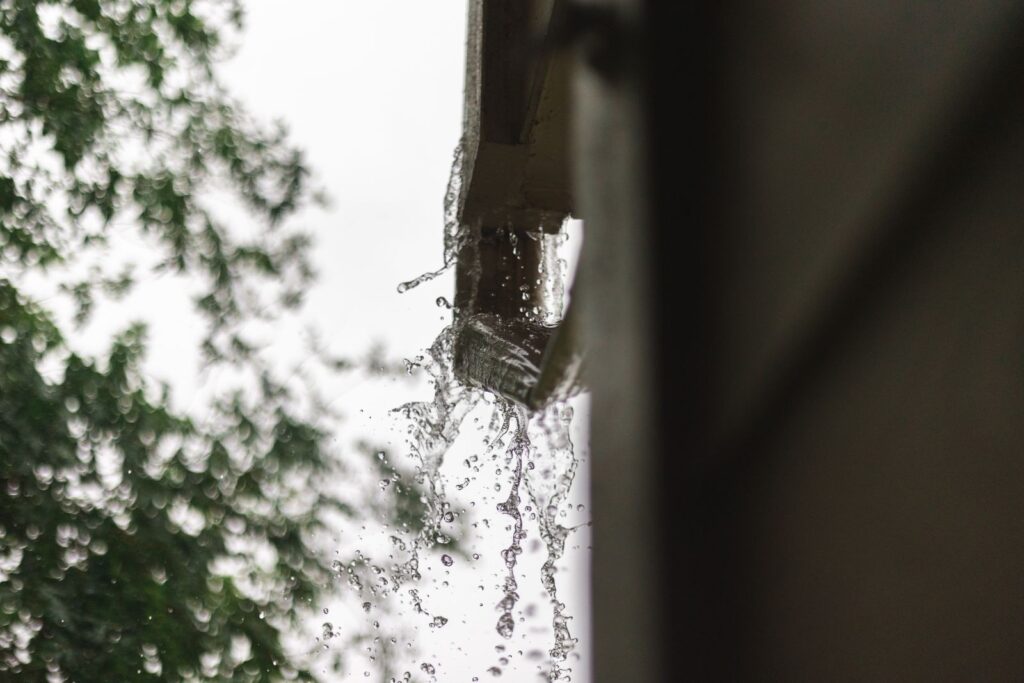
You can pin down the cause in one dry-weather ladder trip: check whether a drip edge exists and reaches into the gutter, sight along the run for sag or bad pitch, tug the gutter for loose hangers, and run a hose or garden sprayer on the roof to watch exactly where water goes behind the gutter.
- Set the ladder right. Firm, level ground, feet locked, top resting against the fascia, not the gutter. Keep your belt buckle between the rails, never lean out sideways. If any part of this eave is two stories up, stop here and call a pro.
- Look for the drip edge. Slide your fingers under the shingle edge at the eave. You should feel a metal lip that angles down into the gutter trough. No metal at all means the drip edge was skipped. Metal that dives behind the gutter’s back edge means it was installed on the wrong side.
- Sight the run for pitch. Crouch at one end of the gutter and sight along it like a rifle barrel. You are looking for sags, bellies, and any section that looks level or tilts away from the downspout. A small torpedo level laid in the trough confirms what your eyes tell you.
- Tug the gutter at the hangers. Pull gently outward every few feet. A solid gutter barely moves. If it flexes away from the fascia or a hanger wiggles, you have found at least part of the problem.
- Check corners, seams, and the downspout. Look for debris dams at the roof edge and standing water in the trough. If the downspout barely trickles when the gutter is full, the clog may be the whole story. This overlaps with routine gutter maintenance, so fold it into the same trip.
- Run the water test. With a helper steadying the ladder, run a garden sprayer or a gentle hose stream onto the roof a few feet above the eave, starting low and working up. Watch from below: the exact spot where water first appears behind the gutter is your answer. Do this on a dry day so old stains do not confuse you.
Write down what you found before you climb down. “Drip edge present but behind the gutter, pitch looks fine, hangers solid” is a complete diagnosis, and it tells you exactly which fix below to use.
Fix one: slip in a drip-edge extension or gutter apron
If the drip edge is missing, short, or tucked behind the gutter, you can slip a new piece of metal flashing under the shingles so its bottom edge drops inside the gutter trough. A gutter apron, a wide L-shaped flashing made for this, works the same way. This is the single most common fix for water running behind a gutter.
A diagnostic guide on this exact problem describes the same repair: a drip-edge extension slipped under the shingles and the existing drip edge, overlapping the gutter’s back edge. Here is how to do it without wrecking the shingles.
- Measure the problem run. You need the length of eave where water gets behind the gutter, plus a foot of overlap at each end. Buy aluminum gutter apron or L-flashing wide enough that the bottom leg reaches well into the trough.
- Work from a ladder on a one-story eave. Warm shingles are more flexible, so a mild afternoon beats a cold morning. Do not walk the roof for this; everything happens from the ladder.
- Lift the shingles gently. Slide a flat pry bar under the first course and ease the nails or adhesive bond loose just enough to slip the flashing in. If a shingle cracks, stop forcing it and work from the next section.
- Slide the flashing under. The top leg goes up under the shingles and under any existing drip edge, flat against the roof deck. The bottom leg should hang down past the fascia and drop inside the gutter’s back edge.
- Get the reach right. A gutter specialist’s repair guide notes that many building codes call for the drip edge to extend at least about three quarters of an inch into the gutter. Aim for that or a touch more; too short and you have rebuilt the original problem.
- Fasten to the deck, not the fascia. A few roofing nails through the top leg into the roof deck hold it. Keep the vertical leg about a quarter inch off the fascia so capillary action cannot bridge the gap.
- Test it. Run the hose test again from step 6 of the diagnosis. Water should pour off the new flashing straight into the trough, with the fascia staying dry.
Fix two: re-pitch the gutter and tighten the hangers
Gutters need about a quarter inch of drop for every ten feet of run toward the downspout, which a diagnostic guide on this exact problem recommends. If the run is level or slopes the wrong way, water sits and finds the back edge. Loosening the hangers, resetting the slope, and re-tightening usually solves it in an afternoon.
- Find the high and low points. The downspout end is the low point. Measure the run in ten-foot sections and mark where the back edge should sit: a quarter inch lower per section as you move toward the downspout.
- Snap a chalk line. Stretch a chalk line along the fascia at the marks so you have a straight reference. Your eyes lie on long runs; the chalk line does not.
- Loosen the hangers, working from the middle outward. Do not remove them all at once or the gutter will twist. Loosen a few, nudge the gutter to the line, snug them back, and move along.
- Replace any hangers that wiggle. A hanger that will not tighten has stripped its bite in the fascia. Swap it for a new hidden hanger screwed into solid wood, ideally into a rafter tail rather than just the fascia board.
- Check with water, not just the level. Pour a bucket of water into the high end. It should flow steadily to the downspout with no ponds. If water still lingers, adjust that section before you call it done.
Long runs are where this stops being a DIY job. Re-pitching forty feet of gutter from a ladder, keeping the line straight while the trough fights you, is exactly the kind of afternoon that ends with a bent gutter and a sore back. A short run over a porch or garage is fair game; a full side of the house belongs to a pro.
Fix three: reseal corners and end caps, and clear the path
Water that only appears behind the gutter near a corner or seam usually comes from a failed seal or a clog forcing water over the back edge. Cleaning the gutter, flushing the downspout, and resealing the corner with gutter sealant is cheap, and on a one-story house it is a safe afternoon job.
- Clean the gutter first. Scoop the debris, then flush toward the downspout with the hose. Sealant will not stick to a gritty, wet seam, so let the corner dry or wipe it down.
- Find the failed seam. Corners and end caps are the usual suspects. Old sealant looks cracked, peeled, or missing in patches. Scrape the loose stuff off with a wire brush.
- Reseal from the inside. Run a bead of gutter sealant along the inside of the seam, then smooth it with a gloved finger so it fills the joint. Work on a dry day and give it the cure time the tube asks for.
- Flush the downspout. A clogged downspout backs water up into the gutter, which then spills over the back edge and looks like a leak behind the gutter. If the hose backs up, the blockage is real; the early signs of a clogged downspout tell you where to look.
A contractor guide updated this month lists one-story cleaning, flushing downspouts, resealing a corner, and tightening a hanger as DIY-safe jobs, which matches this fix exactly. If you want a schedule so this does not sneak up on you again, here is how often gutters actually need cleaning through the year.
Fix four: deal with rotted fascia or a soft roof deck
If a screwdriver sinks into the fascia board, or paint peels and the wood feels spongy, the water has been getting behind the gutter for a while and the wood is rotting. Cosmetic paint will not save it. Rotted fascia and roof deck boards need cutting out and replacing, which is carpentry work, not a gutter tune-up.
A contractor guide on common gutter problems warns that water running behind the gutter usually comes from a missing or short drip edge or a gutter hung too low, and it rots the fascia and roof deck while the gutter itself looks fine. That is the trap: by the time the wood is soft, the original leak may be years old.
Replacing fascia means removing the gutter from that section, cutting out the bad board, fitting and priming new lumber, and rehanging the gutter with the drip edge and pitch corrected so the rot does not return. Roof deck rot at the eave is worse, since it involves the structure the shingles sit on. Both are pro jobs. The one thing you should not do is paint over soft wood and hope; trapped moisture keeps rotting underneath the new paint, and you will pay for the same repair twice.
Do it yourself, or call a pro? The honest line
One-story gutters are fair game for a careful homeowner: cleaning, hose tests, resealing a corner, slipping in a drip-edge extension, and tightening hangers. Call a pro for anything two stories up, re-pitching long runs, replacing rotted fascia or gutter sections, and any work near the electrical service line.
| Safe DIY (one-story, solid ladder footing) | Call a pro |
|---|---|
| Cleaning gutters and flushing downspouts | Anything two stories up or on a steep roof |
| The 15-minute hose diagnosis | Re-pitching long gutter runs |
| Resealing a corner or end cap | Replacing rotted fascia or roof deck boards |
| Tightening or replacing a loose hanger | Replacing full gutter sections |
| Slipping in a drip-edge extension or gutter apron | Any work near the electrical service line |
A contractor’s guide to common gutter issues draws the line in the same place, and it is worth listening to: the jobs on the right are the ones where a mistake costs real money or a hospital visit. Ladder falls are the classic DIY injury, so keep the ladder on firm level ground, have someone foot it, never overreach, and never work in wind or rain. And treat the electrical service line where it meets the house as a hard boundary; if the problem gutter runs near it, that alone makes it a pro job.
Frequently asked questions
Yes. It rarely hurts the gutter, but it soaks the fascia board and roof deck behind it, and wood rot spreads quietly. Fix the cause, not just the drip.
Usually, yes. A drip-edge extension slips under the shingles from a ladder, and hangers can be loosened and re-tightened with the gutter in place. You only remove gutter sections for fascia replacement.
About a quarter inch of drop for every ten feet of run, according to a diagnostic guide on this exact problem. Stick with that; much steeper just looks crooked.
Light rain may drain fine while a downpour overwhelms a partial clog or sheets past a short drip edge. If heavy rain is the trigger, check for clogs first, then read why gutters overflow in heavy rain.
Yes, they do different jobs. The gutter catches water; the drip edge steers roof water into the gutter. A gutter specialist’s repair guide notes many building codes call for the drip edge to reach at least about three quarters of an inch into the gutter.
Press a screwdriver gently into the wood. Solid fascia resists; rotted fascia lets the tip sink in. Peeling paint and a spongy feel are earlier warnings. If it is soft, get a pro to replace it.
Only if the real cause is fixed at the same time. A brand-new gutter hung too low, or installed without a drip edge, will drip behind itself exactly like the old one. Fix the drip edge, pitch, and fascia with the replacement.
Sources
- An inspection guide by Daniel Friedman on drip edge installation mistakes, nail spacing, and the ice-and-water shield detail
- A gutter specialist’s step-by-step fix for a drip edge installed behind the gutter
- A contractor’s guide to common gutter issues and how to fix them, updated October 2026
- A diagnostic guide to water dripping between the gutter and fascia, with pitch and drip-edge extension details
- A troubleshooting table for water drops on the bottom of a gutter
- A gutter leak repair reference on capillary action and gutter aprons
- A cause-and-solution quick reference for rain running behind the gutter

2 Comments
Pingback: How Often Should Gutters Be Cleaned? (Full Schedule)
Pingback: Gutter Cleaning Cost Factors: 10 Things That Change Your Quote (2026)