

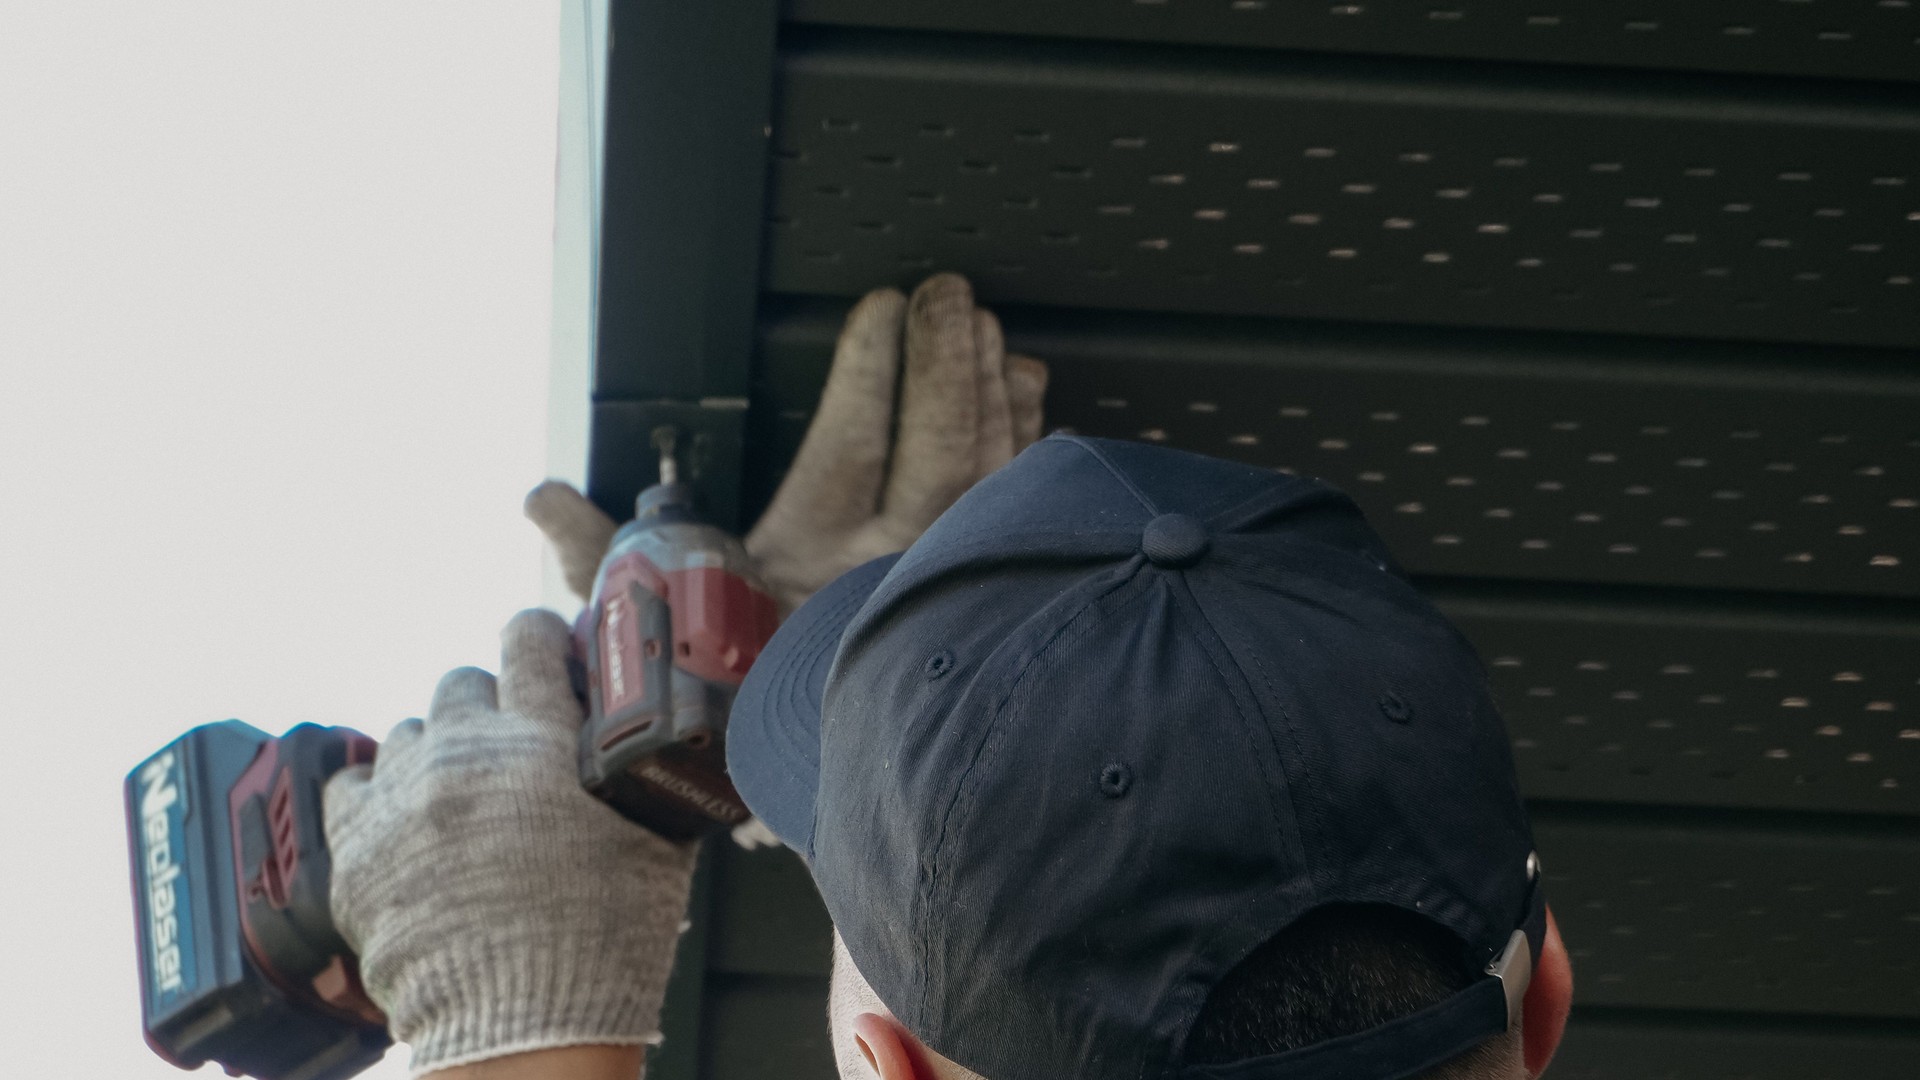
Installing vinyl siding is one of those jobs that looks harder than it is and turns out easier than it looks, as long as you respect one rule. The panels do not get nailed to the wall. They hang from the wall, loose enough to slide. A 12-foot length of vinyl can grow as much as five-eighths of an inch between winter and summer, and every part of the installation method exists to give it that room. Get the nailing right and the rest is measuring, cutting, and locking panels together. Nail it tight and the wall will buckle on the first hot July afternoon.
Contents
- The short answer
- Should you do this yourself?
- Tools and materials
- The nailing rule that decides everything
- Cutting vinyl siding without cracking it
- Installation, step by step
- Five mistakes that show up a year later
- Installing over old siding
- What a pro charges, roughly
- Frequently asked questions
- Sources
The short answer
Vinyl siding installation means hanging overlapping PVC panels from a wall in horizontal courses, each panel locked to the one below it and fastened through slotted nail holes with the fasteners left deliberately loose. That loose fastening is the defining idea of the whole system: the panels float so seasonal expansion and contraction never stress them. Before any panel goes up, the wall needs sound sheathing, a weather-resistive barrier like house wrap, and flashing at every opening. Then the trim goes on first (starter strip, corners, J-channels), the panels get hung bottom to top with quarter-inch expansion gaps at every stop, and the top course gets cut to fit under the eaves with undersill trim.
Should you do this yourself?
Vinyl siding is one of the friendliest exteriors for a DIYer. The panels are light, the tools are ordinary, and a snapped lock either holds or it doesn’t, so you get instant feedback. That said, a full house is genuinely an advanced, multi-day project, not a Saturday chore. A single-story ranch with a calm weekend crew of two can go up in a few days. A two-story colonial with gables, dormers, and a forest of windows is a different animal.
| Your situation | Realistic call |
|---|---|
| One or two stories, simple rectangle, few windows | Strong DIY candidate |
| Steep gables, dormers, bay windows, lots of trim | DIY possible, but slow; get a quote first |
| Two-plus stories needing tall scaffolding | Hire it out; ladder work at that height is where DIY savings turn into hospital bills |
| Wall sheathing is rotted or the old siding hides damage | Hire; you are signing up for carpentry, not just siding |
| Pre-1978 house with old painted siding coming off | At least get a lead-safe contractor involved; see the lead note below |
The honest test is the first wall. If your courses come out level, your laps look clean, and your corners are plumb on wall one, the rest of the house is repetition. If wall one fights you, that is the moment to call a pro, not wall four.
Lead paint note: if your house was built before 1978 and you are stripping old painted siding, the dust is genuinely hazardous to kids. The EPA’s lead-safe renovation guidance recommends hiring a lead-safe certified contractor for the tear-off in pre-1978 homes, even if you hang the new siding yourself. Keep any old paint contained and wet while you work.
Tools and materials
You do not need a siding specialty shop. Everything here comes from a home center. If you are still choosing between profiles, our vinyl siding types and materials guide runs through the options before you buy.
| Item | Why you need it | Notes |
|---|---|---|
| Vinyl siding panels | The wall itself | Buy about 10 percent extra for cuts and mistakes |
| Starter strip | Holds the first course at the right angle | Aluminum or vinyl; aluminum stays crisper |
| Outside and inside corner posts | Finish and protect corners | Buy a few extra; corners are the most visible part |
| J-channel | Receives panel ends at windows, doors, eaves | You will use more than you expect |
| Undersill (finish) trim | Grips the cut top course under windows and eaves | Works with a snap-lock punch |
| House wrap | Weather-resistive barrier behind the siding | Lap it like shingles, top over bottom |
| Corrosion-resistant roofing nails | Fastening | 1-1/4 inch for trim, 1-1/2 inch for panels; aluminum, galvanized, or stainless |
| Tin snips and utility knife | Cutting panels | Snips for notches, knife score-and-snap for long cuts |
| Circular saw with fine-tooth blade, reversed | Fast straight cuts | A plywood blade mounted backward cuts vinyl cleanly |
| Snap-lock punch | Tabs on cut edges so undersill trim can grip them | A few dollars, saves hours |
| Zip tool (unlocking tool) | Separates locked panels without damage | Essential for fixes and fitting around openings |
| Chalk line, 4-foot level, tape measure | Layout | The level matters more than any power tool here |
| Hammer | Nailing | A smooth face, not a waffle face |
Gloves and eye protection go without saying when you are snipping metal-edged vinyl all day, and a stable ladder with three points of contact is non-negotiable once you leave the ground floor.
The nailing rule that decides everything
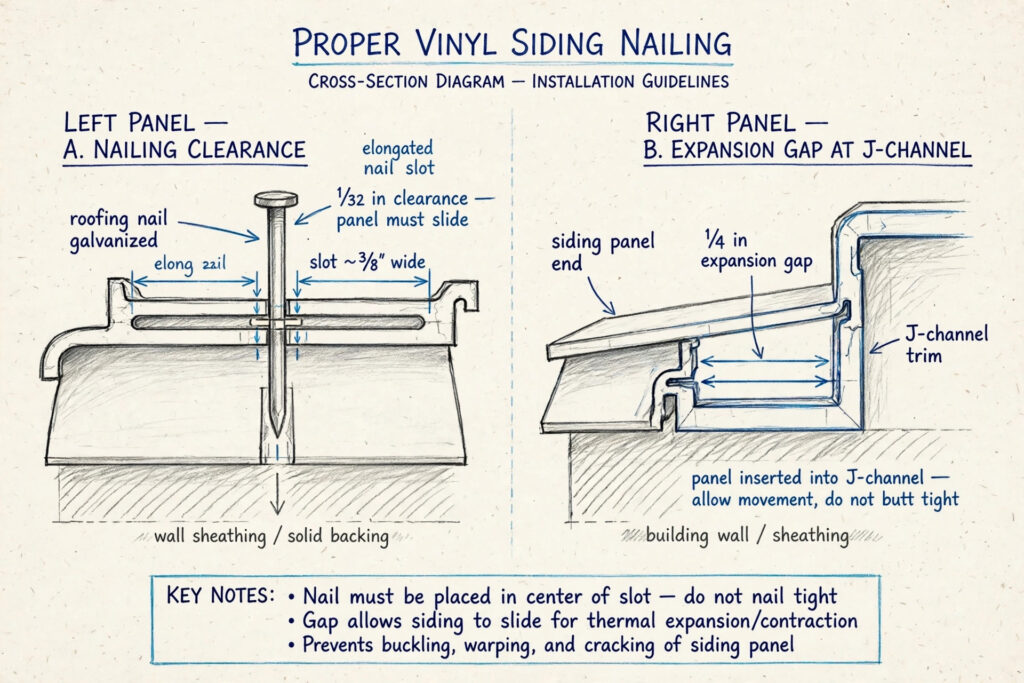
Here is the core concept, and it is worth reading twice: vinyl siding is hung, not fastened. The nail slots in each panel are long for a reason. The nail goes in the center of the slot, driven straight, with the head left about a thirty-second of an inch proud of the panel, roughly the thickness of a dime. The panel should be able to slide side to side a little when you tug it. That small freedom is what lets a 12-foot panel absorb its five-eighths of an inch of seasonal movement without buckling. As This Old House general contractor Tom Silva puts it, the worst thing you can do is nail vinyl tight.
The full spec, in one place:
| Detail | Spec |
|---|---|
| Nail position in slot | Center of the slot (panels and trim); top of the slot only for the top nail of corner posts |
| Nail-head clearance | About 1/32 inch; panel must slide freely |
| Panel nail spacing | Every 16 inches |
| Starter strip and J-channel | Every 8 to 12 inches |
| Gap at trim, openings, and stops | 1/4 inch (3/8 inch when installing below freezing) |
| Panel-to-panel overlap | About 1 inch |
| Lap separation | Never stack laps; separate them by at least 3 courses |
One more detail that separates amateur work from pro work: lap direction. Where two panels meet, the panel nearer the usual viewpoint laps over the farther one, so the seam nearly disappears from where people actually stand. Front door, driveway, street: face the laps away from those sightlines.
Cutting vinyl siding without cracking it
Vinyl cuts easily, which is exactly why people crack it. The panel only resists you when it is cold or when you force a dull blade through it. Score-and-snap with a utility knife handles most straight cuts: score the face a few times against a straightedge, then bend the panel back and forth until it separates. For long rips and faster production, a circular saw with the blade installed backward (a fine plywood blade) cuts cleanly without grabbing. Cut face-up so the saw doesn’t chip the visible surface.
Temperature changes the rules. Cold vinyl turns brittle, and a panel that cuts like butter at 70 degrees can snap at 35. If you must work in the cold, cut slower, support the panel fully on both sides of the cut, and never force it. This is also why the expansion gap grows from a quarter inch to three-eighths when the thermometer drops below freezing: a panel hung tight in January has nowhere to go in July.
Installation, step by step
Work one wall at a time, bottom to top, and finish all the trim on a wall before you hang a single panel. If the sequence feels fussy, that is because the water management depends on the order: flashing under, trim over, panels last.
For a visual walkthrough before you start, watch Shannon from House Improvements hang a full house of vinyl siding in his 33-minute installation video. Seeing the locking motion and the nailing rhythm once will make the written steps click.
How to install vinyl siding on a house: prep and flash the wall, set the starter strip, corners, and J-channels, then hang each panel bottom to top with the nails left loose for expansion. A two-person crew can side a simple one-story house in several days.
-
Step 1: Strip the wall and fix what is underneath
Remove the old siding if it is coming off, along with shutters, lights, downspouts, and house numbers. If the old vinyl is staying as the substrate, wash it first and run the oxidation-vs-dirt test: chalky oxidation should be cleaned off, not sealed under a new layer. Treat any black spots before you cover the wall. Then inspect the sheathing for rot and soft spots and repair them now; new siding over rotten sheathing is a very expensive way to hide a problem. Sweep the wall clean and pull any protruding nails.
-
Step 2: Wrap the wall and flash the openings
Roll house wrap over the sheathing, lapping each course over the one below like shingles, and tape the seams. Flashing goes around windows, doors, and any penetration before the J-channel does: the flashing sheds water, the J-channel just covers the joint. If the existing siding stays and is sound, you can fur it flat with strapping instead of tearing off, but the surface you nail into must be flat and solid.
-
Step 3: Snap a level line and set the starter strip
Find the lowest point of the wall, measure up about an inch and a half above the bottom of the sheathing, and snap a chalk line around the whole house at that height. Nail the starter strip with its top edge on the line, fasteners every 8 to 12 inches in the centers of the slots, heads left loose. Everything above builds off this line, so check it twice. A starter strip that is off by a quarter inch at the bottom reads as visibly crooked three courses up.
-
Step 4: Set the outside corner posts
Snap vertical chalk lines marking each corner, cut the posts about a half inch longer than the wall, and butt them tight to the soffit so expansion is forced downward. Drive the top nail at the top of its slot (this is the one exception to the center-of-slot rule; it lets the post hang), then nail loosely down both flanges about every 12 inches with the rest of the nails centered. Sight down the face: it should read straight.
-
Step 5: Install J-channel around every opening
Fit J-channel around windows and doors and along the top of the wall under the eaves. At inside corners, back the joint with rigid flashing and use a single J on one wall spaced three-quarters of an inch off the intersecting wall: the siding on one side slips into the channel and the other side tucks behind it, which saves a surprising amount of material. Where J pieces meet end to end, lap them three-quarters of an inch. Leave the quarter-inch expansion gap wherever a panel end will land in the channel.
-
Step 6: Lock in the first course and hang the field panels
Hook the bottom of the first panel into the starter strip and push up until you feel the lock engage along the whole length. Before nailing, slide the panel side to side to confirm it moves freely, then nail from the center outward, every 16 inches, heads a thirty-second proud. Each course locks into the one below. Keep laps a full inch, keep them three courses apart vertically, and face them away from the main sightlines.
-
Step 7: Fit panels around windows and doors
Measure each panel to leave the quarter-inch gap at both ends, cut, and slide the ends into the J-channel. Below a window, the panel often needs a notch: cut the notch with snips, and where the cut removes the panel’s locking edge, punch snap-lock tabs every 6 inches along the cut edge so the undersill trim has something to grip. Above the window, the same undersill treatment holds the top of the cut panel.
-
Step 8: Cut the top course and finish under the eaves
The last course almost never lands at full height. Measure the remaining space, rip the panel to width, punch snap-lock tabs along the cut edge, and lock it into undersill trim nailed inside the J-channel under the soffit. On gables, cut the panel ends at the roof angle and leave the expansion gap at the rake J-channel; drive the first fastener toward the downhill side of the slot so the panel grows away from the roof as it expands.
-
Step 9: Walk the wall and check everything
Sight down every course for waves or bellies. Tug panels at random: each should shift slightly in its slots. Check that every lap faces away from the main viewpoint, every J-channel has its gap, and no nail head is pinning a panel tight. The wall should look calm. If any course looks wavy, the cause is almost always a tight nail or a starter strip that drifted off level.
Five mistakes that show up a year later
Most vinyl failures are not visible on installation day. They arrive with the first hot summer or the first hard freeze, which is why these five deserve their own section. Every one of them traces back to the nailing rule.
| Mistake | What you will see later | The fix, now |
|---|---|---|
| Nails driven tight | Wavy, buckled courses on hot afternoons | Leave 1/32 inch; every panel must slide in its slots |
| Nails off-center in the slots | Panels creep and bind, gaps open at one end | Center every nail; top-of-slot only for corner-post top nails |
| No expansion gap at trim | Panels push against J-channel and bow outward | 1/4 inch everywhere, 3/8 inch below freezing |
| Laps stacked vertically | A visible dashed line up the wall | Separate laps by 3 or more courses, vary the stagger |
| Skipping the wall prep | New siding telegraphs every bump; trapped moisture rots sheathing | Flatten or repair sheathing, wrap the wall, flash openings first |
Installing over old siding
You can install vinyl over existing siding, and plenty of contractors do it, but “can” and “should” diverge here. Going over the old layer saves the tear-off labor and disposal, and rigid foam laid over the old siding can even add insulation and flatten minor waviness. It works when the old siding is flat, firmly attached, and dry underneath.
Tear it off when the old siding is wavy, rotted, holding moisture, or hiding unknown sheathing. You cannot inspect what you cannot see, and vinyl over a wet wall just builds a prettier trap. If you do go over the top, the surface must still end up flat: fur out the low spots, nail through to solid sheathing or studs, and remember the wall assembly gets thicker, which means extending window and door trim, fixtures, and vents to match.
What a pro charges, roughly
Knowing the pro price helps you decide whether the DIY savings are worth your weekends. This Old House, citing 2024 industry reports, puts a full vinyl siding installation at roughly $6,370 to $18,250 for a typical 2,000-square-foot home, materials and labor included, with labor alone running $3.70 to $5 per square foot. House size, stories, tear-off, repairs, and region move the number around a lot. DIY materials for the same house typically run a fraction of that, which is the whole appeal, but price the job honestly: panels, trim, wrap, fasteners, plus dumpster or dump fees if you tear off, plus the scaffolding or ladder jacks for a two-story.
If the numbers push you toward hiring, get at least three bids and compare them on tear-off, wrap, and trim details rather than the bottom line alone. And if your current siding is only tired rather than failing, painting it is far cheaper than replacing it: our guide to painting vinyl siding walks through when paint is the right call.
Frequently asked questions
Leave a quarter inch of clearance wherever a panel end meets trim, J-channel, corner posts, or any other stop. That gap absorbs the panel’s seasonal movement. When you are installing in freezing weather, bump it to three-eighths of an inch, since the panel will only grow from there as temperatures rise.
No, never. Drive each nail into the center of its slot and leave about a thirty-second of an inch between the nail head and the panel, roughly the thickness of a dime. The panel should slide side to side freely. Tight nails are the single most common cause of buckling and wavy courses.
You can, with adjustments. Cold vinyl is brittle, so cut slower, support panels fully, and handle them gently. Increase the expansion gap at trim from a quarter inch to three-eighths. Many installers prefer a mild overcast day in the 50s or 60s, when the panels sit near the middle of their expansion range.
Yes, if the old siding is flat, sound, dry, and firmly attached. Lay rigid foam or furring over it to create a flat nailing surface and nail through to solid backing. Tear off instead if the old siding is wavy, rotted, or hiding moisture damage you cannot inspect.
Snap a level chalk line around the house, nail the starter strip with its top edge on the line, then hook the first panel’s bottom locking edge into the starter strip and push up until it engages along the full length. Confirm the panel slides freely before you drive the first nail.
Corrosion-resistant roofing nails: aluminum, hot-dipped galvanized, or stainless. Use 1-1/4 inch nails for trim pieces like the starter strip and J-channel, and 1-1/2 inch for the panels. Never use plain steel nails; the rust streaks will bleed through within a season or two.
A two-person DIY crew can side a simple one-story ranch in a long weekend to a week. A two-story house with gables and many windows can take several weekends. Pros with a full crew typically finish a straightforward house in a few days. Your first wall is the slowest; the pace roughly doubles once the rhythm sets in.
Sources
The claims in this guide come from the pages actually opened during research: Fine Homebuilding’s guide to laying out and installing vinyl siding (corner, J-channel, and starter-strip technique), This Old House’s vinyl siding guide (nailing clearances, expansion gaps, Tom Silva’s nailing advice, and cost ranges), Shannon’s full-length vinyl siding installation video at House Improvements, and the EPA’s lead renovation, repair, and painting program page.

2 Comments
Pingback: What Is Vinyl Siding? Types, Materials & Protection Guide
Pingback: How Long Does Vinyl Siding Last? Lifespan Explained