

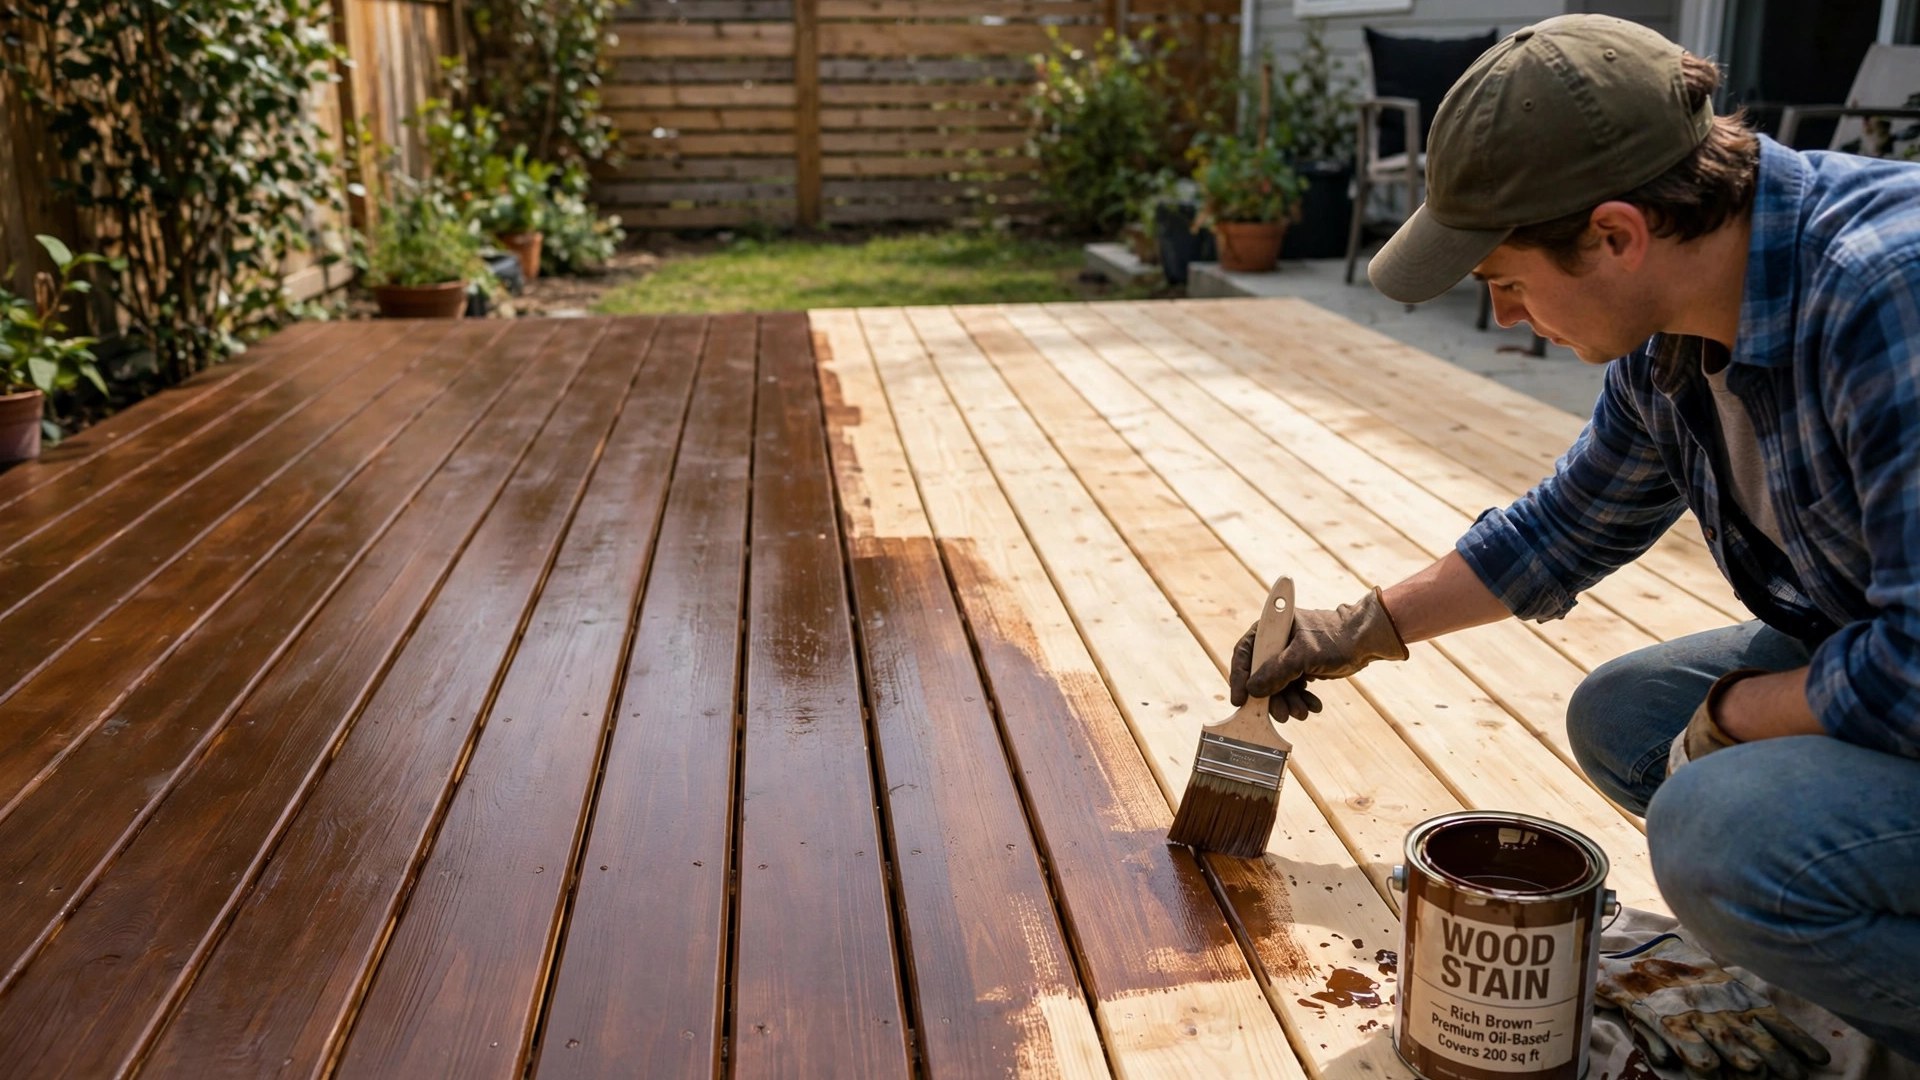
Staining a wood deck means working a protective, pigmented finish into clean, dry boards so water beads off, sun damage slows down, and the wood keeps its color instead of turning gray. The short answer is simple: clean the deck, fix loose fasteners and damaged boards, sand only where the surface needs it, test the color on a hidden board, then brush on thin coats with the grain, back-brushing as you go, and let the finish cure before furniture goes back.
Last updated: October 27, 2026
Most stain jobs fail in prep, not in application. A coat laid over dirt, gray fibers, or a still-damp board cannot soak in properly, so it peels, blotches, or wears off in patches. Get the surface ready first and the staining itself is steady, simple work, two or three boards at a time.
This guide covers application only. Cleaning in full, how often to restain, and how to choose between stain and sealer each have their own guides, and they are linked where they matter below, so this article does not repeat them.
Contents
- Is your deck ready to stain?
- Pick your stain opacity
- Prep in order: clean, repair, sand, dry
- Stain the deck, step by step
- Brush, roller, pad, or sprayer?
- The weather window that protects your work
- Mistakes that ruin a stain job
- DIY or hire a pro?
- After staining: curing, furniture, and upkeep
- Frequently asked questions
- Sources
Is your deck ready to stain?
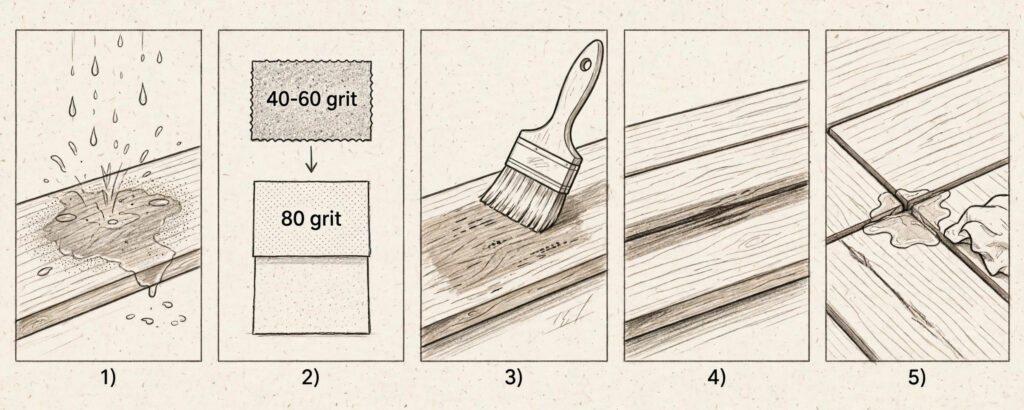
A deck is ready to stain when the boards are clean, fully dry, and able to absorb finish, with no peeling coating, soft wood, or loose fasteners in the way. If water sprinkled on a board soaks in and darkens the wood within a minute or two, the surface is open. If it beads and sits, an old finish or mill glaze is still sealing the wood, and stain laid over it will sit on top instead of soaking in.
Walk the whole deck before you open a can. Press a screwdriver tip gently into posts, joists, and any board that looks dark or soft, and check the ledger where the deck meets the house for loose fasteners. This Old House, in its deck restoration guide, treats a screwdriver sinking into a post or joist as a sign of rot that needs a bigger repair, not a coat of stain. Soft, spongy, or cracked-through boards should be replaced first. Stain hides color, it does not restore structure.
Then read the old finish, not just the wood. A finish that faded evenly and left the boards smooth usually needs only cleaning and brightening before a fresh coat. Peeling solid stain or paint, thick flaking patches, and fuzzy fibers after washing are different: those need stripping or sanding, covered in the prep section below. If you are unsure whether your deck needs cleaning first, our guide to how to clean a wood deck walks through the full cleaning method, and this guide picks up at the staining stage.
| What you find | What it means | Do this first |
|---|---|---|
| Water soaks in and darkens the board | Wood is open and ready to accept stain | Clean, dry, and stain |
| Water beads and sits on the surface | Old finish, sealer, or mill glaze is sealing the wood | Clean, brighten, and sand lightly, then retest |
| Even fading, smooth boards | Old stain wore away naturally | Clean and brighten, sanding usually not needed |
| Peeling, flaking, or thick old coating | New stain cannot bond to loose material | Strip or sand back to sound wood first |
| Soft, spongy, or cracked-through boards | Structural damage, not a finish problem | Replace the boards before staining |
| Cupped boards holding water | Boards are warping and trapping moisture | Read our guide to why deck boards cup before you coat over the problem |
Pick your stain opacity
Stain opacity is simply how much pigment the finish carries, and pigment is what blocks sun damage. Clear finishes show the most grain and give the least sun protection. Solid stains hide the grain almost like paint and give the most sun protection, but they sit on the surface as a film, so they can peel where penetrating stains wear away gradually. For most decks in decent shape, a semi-transparent stain is the practical middle ground: grain still shows, color evens out, and sun protection is real.
This Old House recommends a semi-transparent stain for older decks for exactly that reason, noting that the grain still shows through while the pigment gives old wood a clean, uniform color and helps new boards blend in. If your boards are heavily weathered, gray, or patched with new lumber, step up the opacity rather than laying on extra coats of a thin stain. Extra coats of a penetrating stain do not turn it into a solid stain, they just leave excess on the surface.
| Opacity | What it looks like | Best for | Watch out for |
|---|---|---|---|
| Clear or transparent | Natural wood, almost no color change | New cedar or redwood in great shape | Least sun protection, shortest life on horizontal boards |
| Semi-transparent | Grain visible, color evened out | Most decks in decent shape, older decks needing uniform color | Follow the label on coats, excess can leave a tacky film |
| Semi-solid | Most grain hidden, some texture shows | Weathered decks, mixed old and new boards | Film-forming, so prep and thin coats matter more |
| Solid | Looks close to paint, grain hidden | Badly weathered decks where grain is not worth showing | Can peel like paint if moisture gets under the film |
Opacity is not the same choice as stain versus sealer, and it is not the same question as how often to restain. If you are still deciding between stain and sealer, read our deck stain vs sealer comparison first. If the deck is due for a coat and you want timing, our guide to how often to stain a deck covers the water test and realistic timelines by stain type. And if you are weighing stain against paint, our guide to what kind of paint to use on a wood deck explains when paint is the better call and when stain wins.
Prep in order: clean, repair, sand, dry
Good prep follows one order, and skipping a step to save a day usually costs a season. Clean first, repair second, sand only where needed third, and let the wood dry fully last. Stain goes on only after all four are done, and the test patch comes before the first full section.
Clean and brighten
Clean the deck with a cleaner made for wood decks, scrub with the grain, rinse well, and follow with a wood brightener if the cleaner label calls for one. The brightener evens out color and neutralizes the cleaner so stain takes evenly. Our cleaning guide covers cleaners, pressure settings, and wood types in full, so this article does not repeat that method. What matters here is the result: no dirt, no green film, no gray fuzz left on the surface, and no cleaner residue dried onto the boards.
Repair and set fasteners
Tighten loose screws, replace missing ones, and drive popped nails flush or just below the surface with a nail set so they do not catch a brush, pad, or sander. Replace any board that is soft, split through, or rotted. Sanding cannot fix a board that is failing, and stain cannot glue it back together. Keep a note of any board you replace, since fresh lumber often drinks stain darker than older boards around it, and a test patch will show you that difference before the whole deck does.
Sand where the surface needs it
Sanding opens the grain, knocks down raised fibers and splinters, and gives stain something to grip. It is not needed before every coat. DeckStainHelp, written by a restoration contractor with decades of deck work behind him, puts it plainly: sand when the wood is rough, splintered, or fuzzy from washing, or when patches of old solid stain or paint are still stuck after stripping. If the old stain faded evenly and the wood feels smooth, cleaning and brightening prepare the surface just as well with far less work.
The grit rule for penetrating stains is simple, and getting it wrong is one of the most common prep mistakes. Start coarse only where you need to remove old coating or rough wood, finish at 80 grit, and stop there. Finer paper polishes the surface and closes the pores that stain needs to soak into, which leaves a finish that looks fine on day one and fails early. Always sand with the grain, never across it, and keep the sander moving so it does not dig a dip into a soft board.
| Job | Grit to use | Notes |
|---|---|---|
| Strip old solid stain or paint, smooth rough or damaged boards | 40 to 60 grit | First pass only, then refine, never finish here |
| Final smoothing pass before a penetrating stain | 80 grit | Finish here, do not go finer for penetrating stains |
| Light pass on new boards with mill glaze, or fuzz after washing | 80 grit, light touch | Break the glaze, do not polish the board |
| Rails, edges, corners, between boards | 80 grit by hand or detail sander | Match the field grit, keep edges crisp, do not round them off |
| Between coats of a film-forming solid stain | Follow the label, light scuff only if needed | Penetrating stains usually need no sanding between coats |
| Sander | Best for | Caution |
|---|---|---|
| Belt sander | Medium decks, general resurfacing | Can leave marks if held in one spot too long |
| Drum or floor sander | Large decks, heavy old coating removal | Heavy and aggressive, easy to gouge if you stop moving |
| Random orbital or palm sander | Edges, rails, detail work, final 80-grit pass | Too slow as the only tool on a large deck |
| Detail sander or hand block | Corners, posts, tight spaces | Slow, but the only way into spots machines cannot reach |
After sanding, remove every bit of dust. Vacuum or blow the boards, gaps, rails, and steps, then wipe with a damp cloth if the surface still feels dusty. DeckStainHelp warns that leftover dust causes blotchy, uneven stain absorption, and that matches what you see on a finished deck: dull patches where dust sat in the grain. If you sanded, clean and brighten after sanding, not before, so the pores are open when you stain.
Dry fully, then test the color
Let the deck dry fully before staining. DeckStainHelp advises letting a power-washed deck dry at least 48 hours before sanding, and the same patience applies before staining: shade, humidity, and thick boards all stretch drying time, so judge the wood, not the calendar. Stain applied to damp wood cannot soak in evenly and may trap moisture under the finish.
Test the color on a hidden board, the underside of a rail, or a stair tread edge before you commit to the whole deck. Stir the can well, brush on a small patch, let it dry, and look at it in daylight. Stain always looks darker wet than dry, and old boards next to new boards can take the same stain very differently. Behr makes the same point on its semi-transparent stain directions: test for penetration and color on a small hidden area before proceeding, and intermix multiple cans so color stays uniform across the deck.
Stain the deck, step by step
To stain a wood deck well, work from the top down and in small sections, brushing thin coats with the grain and back-brushing every section while it is still wet. Start with rails and balusters, then board ends and gaps, then the floor, two or three boards at a time, so you always have a wet edge to work into and never step onto wet stain.
- Protect the house and plants.
Tape plastic or drop cloths along siding, doors, and windows near the deck, and cover plants below the rails. Stain drips through board gaps, so clear or cover anything stored under the deck too.
- Stir, do not shake, and do not thin the stain unless the label says to.
Behr warns plainly on its semi-transparent stain directions: do not thin the product, and over-application leads to surface failure including peeling and cracking. Stir occasionally as you work so pigment does not settle.
- Stain the rails, balusters, and posts first,
working top to bottom so drips land on unstained wood below, not on a finished rail. Use a brush for detail work and catch drips before they dry.
- Brush the board ends and the gaps between boards.
Ends drink stain fast and are easy to miss, and untreated gaps let water into the board edges. A small brush or stain pad reaches both.
- Stain the floor two or three boards at a time, full board length, end to end.
Work with the grain, keep a wet edge, and never stop mid-board, since a stopped edge dries into a lap mark that shows as a darker line.
- Back-brush every section right away.
If you rolled or sprayed the stain on, follow immediately with a brush or pad, pushing the stain into the grain and clearing puddles. Behr directs applicators to work in small sections, saturate lightly, and immediately back-brush to eliminate puddling and distribute the stain evenly.
- Wipe up excess that has not soaked in.
Puddles at joints, on end grain, and in low spots will dry tacky and peel later. A clean rag or a dry brush pass takes them off while the section is still workable.
- Plan your exit before you start the floor.
Work toward the steps or the door so you never have to walk across wet stain to get off the deck.
- Apply a second coat only if the label calls for one, and only after the first coat has dried as the label directs.
For its semi-transparent stain, Behr specifies two thin coats, with 1 to 2 hours before recoat and 72 hours for full cure. Other products differ, so the can you bought outranks any general rule, including this article.
- Let the deck cure before furniture goes back.
Light foot traffic and furniture have different waits, and both are on the label. If your product gives no furniture time, wait at least a few days and check that the surface feels hard and dry, not tacky, before dragging anything across it.
This Old House gives the same sequence in shorter form: spray or roll for speed, then brush to work the stain in, in thin, even coats with the grain, two or three boards at a time. Sherwin-Williams shows the same pairing on its staining guide: roll the stain on, then brush over it gently with the grain, brush between the boards, and allow at least four hours of drying before a second coat if one is needed. Different brands, same principle: the tool gets stain onto the wood, the brush gets it into the wood.
Brush, roller, pad, or sprayer?
The best applicator for a wood deck is the one that gets stain into the grain without leaving puddles or lap marks, and for most homeowners that means a brush, with a roller or sprayer used only as a delivery tool followed by back-brushing. A brush alone is slow on a large deck but gives the most control. A roller or sprayer alone is fast but leaves uneven coverage, air bubbles, and puddles that a brush would have cleared.
| Tool | Strengths | Weaknesses | Use it for |
|---|---|---|---|
| Brush | Pushes stain into grain, best control, reaches gaps and rails | Slow on large floors, hard on knees and back | Detail work, rails, and back-brushing every section |
| Roller with extension pole | Fast coverage, saves your back | Can puddle, bubble, and miss gaps if not back-brushed | Delivering stain to the floor, then back-brush at once |
| Stain pad | Smooth, even laydown on flat boards | Struggles in gaps and around fasteners | Flat floor sections, with a brush for gaps and edges |
| Sprayer | Fastest on large decks and rail systems | Overspray on siding and plants, masking takes time | Large decks only, with masking and immediate back-brushing |
If you spray, mask everything you do not want stained, and keep the sprayer moving so no section gets a heavy pass. If you roll, use a nap suited to rough wood and do not overload the roller. Either way, the rule from every maker above holds: the second tool, brush or pad, is not optional. It is the step that turns a coat sitting on the wood into a finish soaked into the wood.
The weather window that protects your work
The best weather for staining a deck is a mild, dry stretch with no rain in the forecast, moderate temperatures, and no hot sun baking the boards while you work. Heat dries stain before it can soak in, cold slows curing, and rain on fresh stain washes pigment out and leaves a blotchy finish.
Behr sets the window for its semi-transparent stain at 40 to 90 degrees Fahrenheit, with the wood completely dry and no rain expected within 24 hours. Treat those numbers as a starting point, not a universal rule, since other products set different limits. Read your own label for temperature, rain, and humidity limits, and check the overnight low as well as the daytime high. A warm afternoon followed by a cold night can slow curing just as surely as a cold morning.
Work in shade where you can, or follow the shade across the deck during the day. If the boards feel hot to the touch, wait. Direct sun flash-dries stain on the surface, which looks fine until the first rain shows where the finish never soaked in. Wind matters too: it dries stain fast, blows dust onto wet boards, and carries spray onto siding. A calm, overcast day with a dry forecast is worth waiting for, and a rushed coat in bad weather is the most common reason a stain job needs redoing within a year.
Mistakes that ruin a stain job
Most failed stain jobs trace back to a short list of avoidable errors, and every one of them shows up in the first season. Thick coats, wet wood, and skipped prep account for most of them. The rest come from stopping mid-board, staining in hot sun, or putting furniture back before the finish has cured.
| Mistake | What happens | How to avoid it |
|---|---|---|
| Laying stain on thick | Excess sits on the surface, dries tacky, then peels and cracks | Two thin coats at most, back-brush, wipe puddles while wet |
| Staining damp or dirty wood | Stain cannot soak in evenly, finish blotches and wears in patches | Clean, brighten, and dry fully, then test absorption |
| Sanding too fine | Polished grain rejects stain, finish fails early | Finish at 80 grit for penetrating stains, follow the label for film stains |
| Leaving sanding dust on the boards | Dull, blotchy patches where dust sat in the grain | Vacuum and wipe after sanding, then brighten |
| Stopping mid-board or letting an edge dry | Lap marks, dark lines where wet met dry | Work full board lengths, two or three boards at a time, keep a wet edge |
| Staining in hot sun or before rain | Flash drying, poor penetration, washed-out pigment | Follow the shade, respect the label temperature and rain window |
| Skipping the test patch | Color surprises across the whole deck, old and new boards mismatch | Test a hidden board, let it dry, judge in daylight |
| Moving furniture back too soon | Scuffs, sticking, and peeled patches under feet and planters | Follow the label cure time, check for tackiness first |
One safety note deserves its own line. Stain rags, especially oil-based ones, can heat up as they dry and, in a pile, can catch fire. Spread used rags flat outdoors to dry, or soak them in water in a sealed metal container, and follow your local disposal rules. Never leave a pile of stain rags in a garage or shed, and keep them away from direct sun while they dry.
DIY or hire a pro?
Staining a deck is a solid DIY job when the structure is sound, the boards are in decent shape, and you have a dry weekend plus a spare day for curing. The work is physical but not technical: clean, sand lightly, brush thin coats, and respect the label. A single-level deck in good repair, with no structural surprises, is well within reach for a careful homeowner with a brush, a sander, and patience.
Call a pro when the deck itself needs work first. Rot in posts or joists, a loose or damaged ledger, widespread soft boards, or a deck that feels bouncy underfoot are structural problems, and stain will not fix them. The same applies to very large or multi-level decks where keeping a wet edge across the whole floor is hard alone, and to decks with old paint that may contain lead: do not sand that dry, get lead-safe advice or hire a contractor who handles it properly. If you do hire out, our guide to deck cleaning cost factors explains what changes a quote, which helps you read a staining estimate too, since prep drives most of the price in both jobs.
As a rule of thumb from this site’s own maintenance guidance, staining sits inside a wider routine: our wood deck maintenance guide covers the inspect, clean, and protect cycle that staining belongs to, and our guide to how long a wood deck lasts shows how regular finishing fits into the deck’s overall life. A stained deck is not a finished project, it is a deck on a schedule.
After staining: curing, furniture, and upkeep
After staining, the job is curing, not drying. A surface can feel dry to the touch while the finish underneath is still soft, so furniture, planters, and rugs go back only after the label cure time has passed. Dragging a chair across a soft finish leaves a mark that no touch-up fully hides, and a planter left on tacky stain can stick and peel a circle off the boards.
Once cured, upkeep is simple. Sweep regularly, rinse off dirt and pollen, and watch the water test each spring: sprinkle water on a few boards, and if it soaks in and darkens the wood instead of beading, the finish is wearing thin and a maintenance coat is coming due. Do not wait until the deck turns gray again. A maintenance coat over a clean, lightly prepped surface is a weekend job. A full strip and restain after years of neglect is a project. For timing, our guide to how often to stain a deck gives the timelines by stain type and exposure, and it is worth reading before you plan the next coat.
Touch-ups work best when they stay small. Keep a little stain from the same can, marked with the color and date, for scuffs and worn traffic paths. Stir it well before use, since pigment settles in storage, and test it on a hidden spot first, since stain in the can can shift color over time. If a whole section has worn through to bare wood, clean and recoat that section properly rather than dabbing stain over dirt.
Frequently asked questions
Use 40 to 60 grit only to strip old coating or smooth rough, damaged boards, then finish at 80 grit. Do not go finer than 80 grit before a penetrating stain, since finer paper polishes the grain and closes the pores stain needs to soak into. Sand with the grain, vacuum all dust, and follow with a brightener if your cleaner label calls for one.
No. If the old stain faded evenly and the boards feel smooth, cleaning and brightening are usually enough. Sand when the wood is rough, splintered, or fuzzy after washing, or when patches of old solid stain or paint remain after stripping. Sanding a smooth deck that does not need it only risks polishing the grain.
Follow your product label. Many semi-transparent stains call for two thin coats, while some penetrating oils call for one coat with excess wiped off. Never lay on one thick coat instead of two thin ones, since excess stain on the surface dries tacky and peels. If the label gives a recoat time, respect it, since recoating too soon traps solvents under the second coat.
Until it is completely dry, which takes longer than it looks. After washing, allow at least 48 hours of dry weather before sanding, and longer in shade or humidity. Judge the wood, not the calendar, and confirm with a sprinkle test: water should soak in and darken the board, not bead and sit. If the boards still feel cool or damp in the morning, wait another day.
Yes, if the old stain is sound and faded evenly, after cleaning and brightening. If the old finish is peeling, flaking, or thick in patches, strip or sand it back to sound wood first, since new stain cannot bond to loose material and will peel with it. Test a hidden board first, since old and new stain can differ in color.
Follow your product label, since times vary by product and weather. As a guide from the labels checked for this article, one semi-transparent stain allows recoat in 1 to 2 hours and full cure in 72 hours, while another maker advises waiting several hours or overnight before moving furniture back. When in doubt, wait until the surface feels hard and dry, not tacky, and lift furniture into place rather than dragging it.
Brush for control, roll or spray for speed, but always back-brush. A brush pushes stain into the grain and reaches gaps and rails. A roller or sprayer gets stain onto a large floor fast, but it must be followed at once with a brush or pad to work the stain in, clear puddles, and prevent lap marks. A roller or sprayer used alone leaves the weakest finish of the three options.
Sources
- DeckStainHelp guide to sanding a wood deck, covering grit choice, sander types, dust removal, and when sanding is and is not needed.
- This Old House guide to restoring an old deck, covering assessment, cleaning, semi-transparent stain choice, and spray-then-brush application.
- Sherwin-Williams guide to staining a deck, covering brightener, roller-then-brush application, brushing between boards, and second-coat timing.
- Behr DECKplus semi-transparent stain directions, covering temperature and rain limits, two thin coats, back-brushing, recoat and cure times, and coverage rates.

2 Comments
Pingback: Best Paint for a Wood Deck: Types, Pros, and When to Stain
Pingback: How to Build a Wood Deck: Framing, Footings, Ledger