

Cleaning a wood deck means removing dirt, gray weathering, algae, mildew, and old grime from the boards without tearing up the wood fibers underneath, so the surface stays safe to walk on and ready for a finish if you plan to add one. The short answer is simple: sweep and clear the deck, read the stain before you pick a cleaner, scrub with the grain using an oxygen bleach cleaner or a cleaner made for wood decks, rinse well, and let the boards dry fully before you judge the result or stain.
Last updated: October 27, 2026
You do not need a pressure washer to get a wood deck clean. A garden hose, a stiff brush, and the right cleaner will handle most decks, and for soft woods and older boards, hand scrubbing is often the safer choice. A pressure washer can speed up the rinse, but it should never do the heavy lifting. The cleaner loosens the grime. The washer only rinses it away.
If your deck feels slippery when wet, start with our guide to identifying green growth on a deck before cleaning. That guide helps you tell algae, mildew, and other growth apart, and this article picks up where it leaves off, with the cleaning steps themselves.
Contents
- Read the stain first
- How to clean a wood deck without a pressure washer
- How to clean a wood deck with a pressure washer
- Which cleaner should you use?
- Cleaning by wood type
- What to do after cleaning
- When to call a pro
- Safety checks worth taking seriously
- Frequently asked questions
- Sources
Read the stain first
Start with the stain, not the cleaner, because each mark points to a different cause and fix. Gray weathering, green slip, black spots, rust marks, and grease each respond to different cleaners, and the wrong one wastes a Saturday or damages the surface. The table below matches what you see to the likely cause and the gentlest method that works.
Walk the deck slowly before you mix anything. Look at the boards in full sun and in shade, since a stain that looks faint in bright light can be obvious under a chair or a planter. Press a fingertip to a green patch. If it feels slick, that patch needs a proper scrub, not just a rinse. Check the gaps between boards too. Leaves and grit trapped there hold moisture against the wood and feed the same growth you are trying to remove.
| What you see | Likely cause | Start here |
|---|---|---|
| Even gray or silver color across the boards | Sun and weather wearing the surface | Oxygen bleach cleaner, then a wood brightener if you plan to stain |
| Green, slimy film, slippery when wet | Algae or surface growth in damp, shady spots | Oxygen bleach cleaner, stiff brush, full rinse, repeat if still slick |
| Black spots or blotches | Mildew, tannin staining, or old grime in the grain | Oxygen bleach cleaner, scrub with the grain, brightener for stubborn tannin marks |
| Orange or brown marks near screws and nails | Rust from fasteners or metal furniture | Oxalic acid brightener on the spot, after a general clean, following the label |
| Dark, greasy patches near a grill | Cooking grease and food spills | Warm water and a mild dish soap first, then a deck cleaner if the mark stays |
| Peeling or flaking old stain | Failing finish, not dirt | Stop. Cleaning alone will not fix this. You need a stripper or sanding before a new finish. |
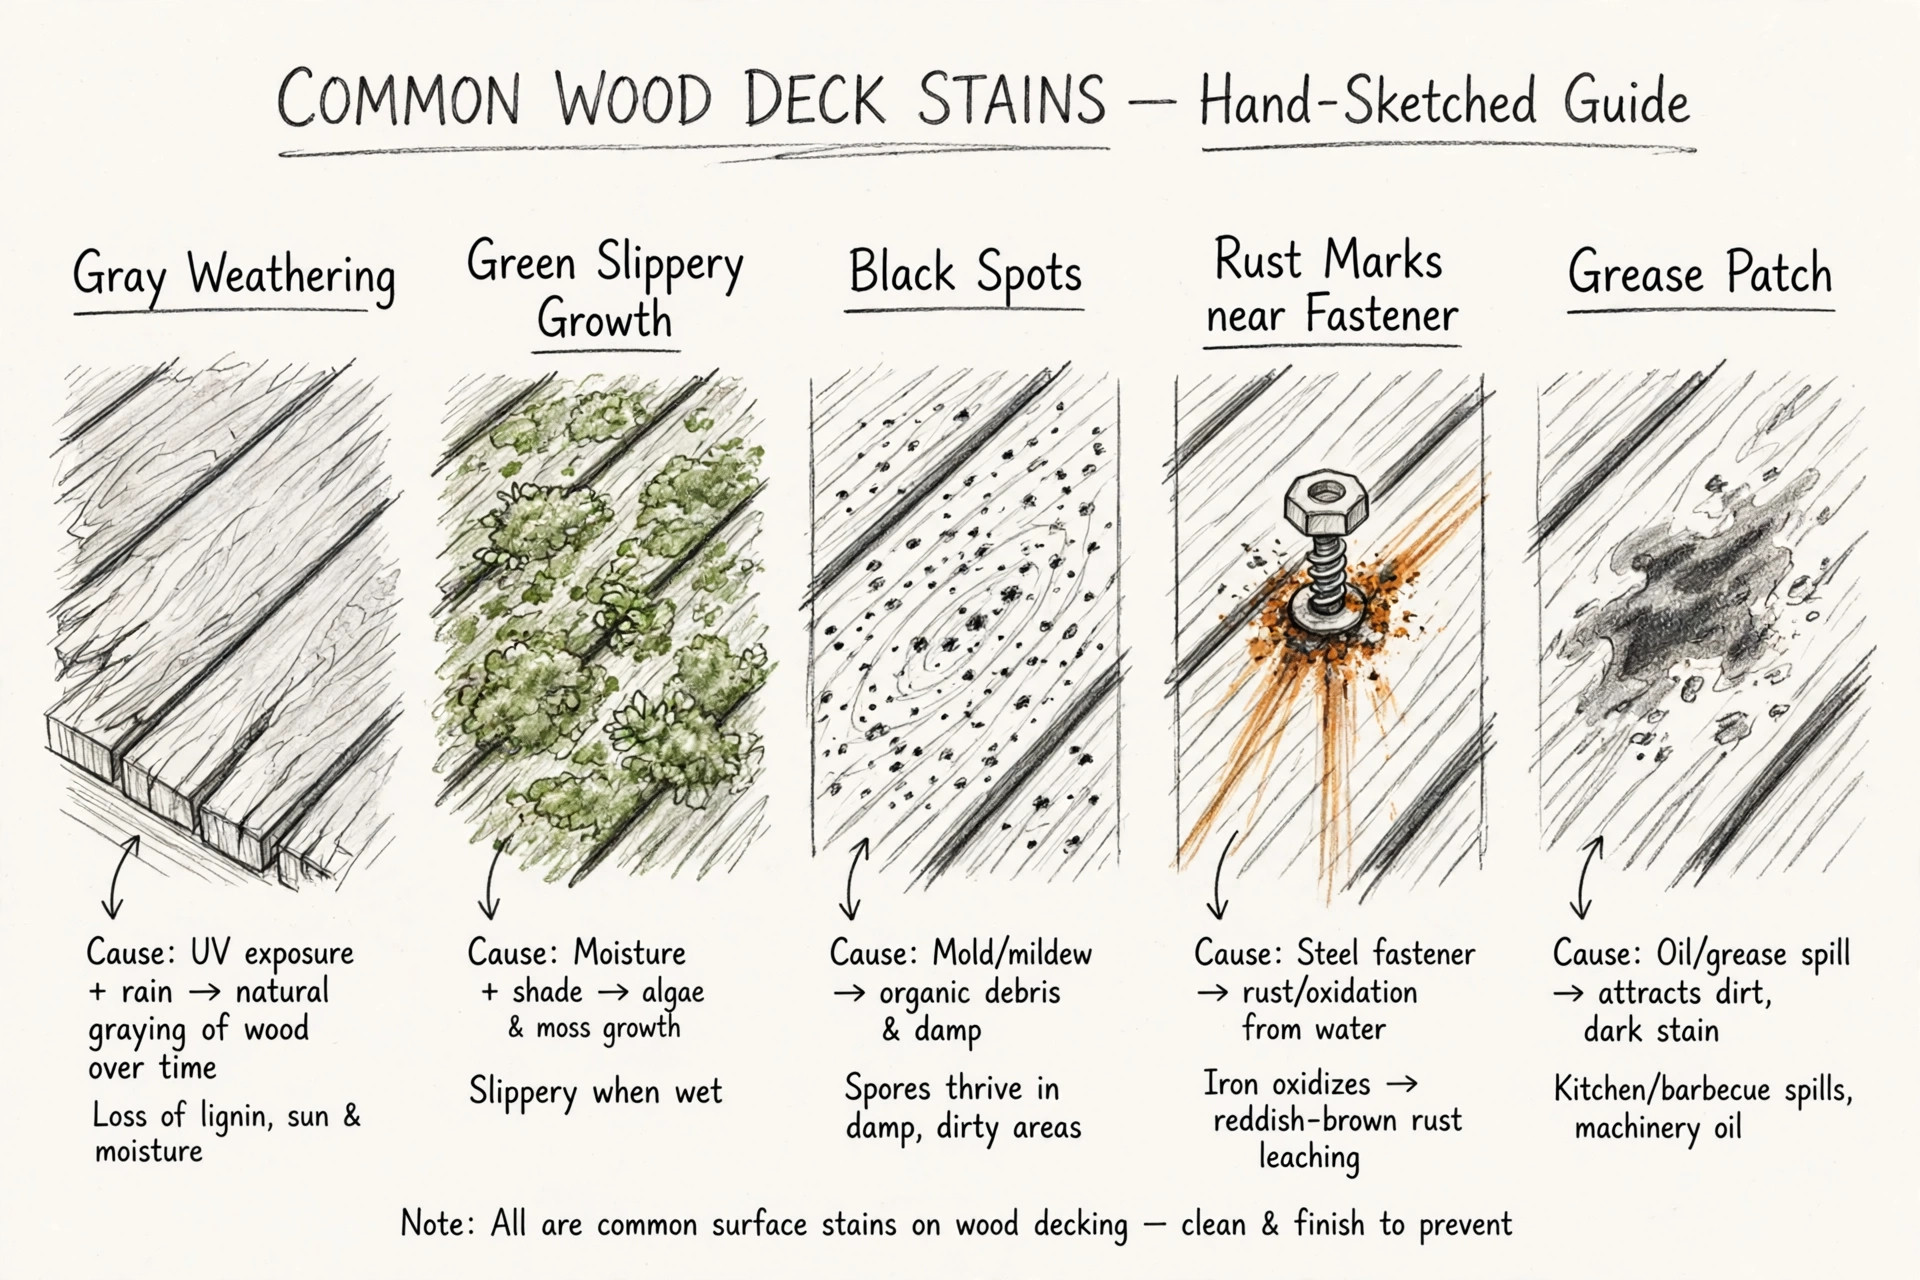
Two quick tests save guesswork. The slip test comes after your first rinse: walk a wet patch in bare feet or press a shoe sole to it. If it still feels slick, growth is still there, and the patch needs a second scrub. The rinse test is simpler. Rinse a small section fully and let it dry before you judge it. Wet wood always looks darker and dirtier than dry wood, and a patch that looks stained when wet often looks fine once it dries.
How to clean a wood deck without a pressure washer
You can clean a wood deck without a pressure washer by scrubbing an oxygen bleach cleaner into the boards with a stiff brush and rinsing with a garden hose. It takes more elbow grease than a machine rinse, and it gives you more control on soft, old, or already rough boards. For most routine cleaning, this is the method I would start with.
Pick a dry, mild day if you can. Hot sun dries cleaner on the boards before it has time to work, and wind blows spray where you do not want it. Work in sections you can finish in one pass, roughly a few boards wide and as long as you can reach with the brush. A section that dries with cleaner on it will need scrubbing twice.
What you need
- Stiff-bristle deck brush with a long handle, plus a smaller hand brush for corners and gaps
- Garden hose with a spray nozzle
- Bucket, pump sprayer, or watering can for the cleaner
- Oxygen bleach deck cleaner, or a commercial cleaner made for wood decks, mixed exactly as the label says
- Eye protection, gloves, and old shoes with good grip
- A putty knife or a thin tool for clearing debris from board gaps
How to clean a wood deck without a pressure washer
- Clear everything off the deck
Clear everything off the deck, including furniture, planters, rugs, and the grill. Sweep loose leaves and dirt off the boards, then clear the gaps between boards so water can drain and dry.
- Wet the deck and nearby plants
Wet the deck, the nearby plants, and any siding close to the work area with plain water. Wet plants rinse cleaner off faster, and a wet deck keeps the cleaner from soaking in too fast in one spot.
- Mix the cleaner
Mix the cleaner in a bucket following the label, not a recipe you found in passing. Stir until any powder dissolves. Pour it into a pump sprayer or apply it with the brush.
- Apply the cleaner one section at a time
Apply the cleaner to one section at a time, starting away from the house and working outward so you are not walking through wet cleaner. Keep the section wet. If it starts to dry, mist it with water or more cleaner.
- Let the cleaner sit
Let the cleaner sit for the time on the label, usually 10 to 15 minutes for a wood deck cleaner. Do not let it dry on the boards.
- Scrub with the grain
Scrub with the grain, using steady, even strokes. Scrubbing across the grain lifts fibers and leaves a rough surface that holds water and dirt. Give green and black patches a second pass rather than pressing harder in one spot.
- Rinse the section thoroughly
Rinse the section thoroughly with the hose until the water runs clear. Rinse the plants and nearby surfaces too, so no cleaner dries on leaves or siding.
- Move to the next section and repeat
Move to the next section and repeat. When the whole deck is done, do the slip test on any patch that worried you, and scrub again if it still feels slick.
- Follow with a wood brightener
If you plan to stain, follow the cleaner with a wood brightener, mixed and applied as its label directs. The brightener neutralizes the cleaner and evens out the color. Rinse again, then let the deck dry fully.
How to clean a wood deck with a pressure washer
To pressure wash a wood deck safely, keep the pressure low, use a wide fan tip, hold the nozzle at a steady distance, and move with the grain without ever stopping in one spot. The machine is a rinse tool here, not a scrub brush. If you have never used one on wood, practice on a hidden board or a scrap piece first.
The single biggest mistake is too much pressure held too close. That combination carves lines into soft wood, raises fibers, and leaves pale streaks that show through stain. DeckStainHelp, run by a restoration contractor with decades of deck work behind him, puts the working range at 1,500 to 2,000 PSI with a fan tip, moving with the grain, and treats the washer as a way to rinse loosened grime rather than grind dirt off the surface. That matches what most wood care makers advise, and it is a sensible ceiling for a first attempt.
Settings by wood type
| Wood type | Pressure to stay under | Nozzle | Distance and motion |
|---|---|---|---|
| Pressure-treated pine | 1,500 to 2,000 PSI | 25 or 40 degree fan tip | About 12 inches away, steady sweeps with the grain |
| Cedar and redwood | 500 to 1,000 PSI, and test first | 40 degree fan tip | Start farther back, about 18 inches, and close in only if the wood is unmarked |
| Ipe and dense tropical hardwood | Skip the washer if you can, or stay at the low end and test first | 40 degree fan tip only | Keep moving, never pause, and stop at the first sign of streaking |
- Clean the deck first, by hand, following the no-pressure-washer steps above. The cleaner does the work. The washer only rinses.
- Fit a fan tip, never a pinpoint or rotating turbo tip on wood. A pinpoint jet cuts a line into a board in a second, and a rotating tip is made for concrete, not decking.
- Test on a hidden board, a stair tread edge, or a spot under a planter. Rinse a short pass, let it dry, and check for fuzz, grooves, or pale streaks before you touch the main deck.
- Work one section at a time, with the grain, in long overlapping sweeps. Keep the nozzle moving the whole time the trigger is pressed. Lift the wand before you change direction, so you do not leave a stop mark.
- Keep a steady distance from the boards. Drift closer when you reach a stubborn patch, and you will carve a dip that shows in sunlight.
- Rinse until the water runs clear, then rinse plants and nearby surfaces again. Let the deck dry fully before you judge the color or decide whether a second pass is needed.
If the boards start to fuzz, stop. Fuzz means fibers are lifting, and more pressure will only make it w For most wood decks, an oxygen bleach cleaner is the best default choice, because it lifts dirt, mildew, and algae without the fiber damage that chlorine bleach causes. Commercial cleaners made for wood decks are a step up in strength for heavy graying, and a wood brightener after cleaning restores color and pH. Vinegar has a narrow use, and chlorine bleach should not be your routine deck cleaner. The case against chlorine bleach is not just a preference. Viance, the treated-wood maker behind the Treated Wood guidance, warns that household chloride bleaches can strip preservatives and damage wood fibers, leaving an unnatural whitewashed look, and it recommends mild soap and water or a commercial cleaner with oxalic acid instead. That advice is aimed at treated wood, but the same caution applies to cedar and redwood, where a harsh cleaner strips color you cannot easily put back. Wood type changes how much pressure, scrubbing, and chemical strength a deck can take, so match the method to the boards you actually have. Soft woods dent and fuzz fast, cedar and redwood lose color fast, and dense hardwoods resist both cleaner and finish. When you are unsure what your deck is made of, treat it as the softer option until a test patch proves otherwise. Pressure-treated pine is the most forgiving wood deck to clean, and it is also the most common. A stiff brush and an oxygen bleach cleaner will handle most of it, and a pressure washer at the low end of the range in the table above is fine once you have tested a hidden board. Keep the gaps clear, since pine boards cup and hold water when debris packs the gaps. The treated-wood guidance from Viance suggests cleaning at least twice a year in mold-prone spots, and that rhythm fits a pine deck under trees or near a damp yard. Cedar and redwood clean up beautifully, and they punish rough handling just as fast. Both are soft, and both lose their warm color to sun and to harsh cleaners. Use a softer brush than you would on pine, keep pressure low or skip the washer entirely, and always follow cleaning with a brightener if you want the warm tone back. Messmer’s cleaning guide for cedar, redwood, pine, and pressure-treated wood pairs its cleaner with a brightener for redwood and cedar, and that two-step approach is what brings the color back instead of leaving the boards flat and gray. Never use a metal brush on cedar or redwood. Metal bristles scratch the soft surface and can leave dark marks that show through a clear finish. A nylon or fiber brush, used with the grain, is the right tool. Ipe is a different animal. It is dense, oily, and slow to absorb anything, including cleaner and finish, and that density is both its strength and its trap. Dirt sits on the surface rather than soaking in, so a gentle clean often does more than an aggressive one. The DeckWise hardwood preparation guide from IpeOil advises against a pressure washer for hardwood, warning that it can leave streak marks and raise the grain, and it lays out a cleaner-then-brightener sequence with a full dry before any oil goes on. For an ipe deck, use a soft or medium brush, a cleaner made for hardwoods, and a brightener if the boards have grayed and you want the brown back. Work in small sections, rinse fully, and let the deck dry for at least a day or two in good weather before you judge the color. New ipe needs time to weather before it will take a finish well, so if your deck is new, clean it gently and wait before you oil it, following the finish maker’s timing rather than a calendar guess. After cleaning, let the deck dry fully, inspect it in daylight, and only then decide about stain, since a finish applied to damp wood traps moisture and fails early. Drying takes at least 24 to 48 hours in good weather, and longer in shade, humidity, or cool air. The surface can feel dry while the boards underneath are still damp, so give it the full time. For the full upkeep picture, including inspection and protection between cleans, see our wood deck maintenance guide. It covers the routine that keeps a clean deck clean, rather than repeating the cleaning steps here. Staining timing is its own question, and it depends on how the deck looks and how the old finish has worn, not on the calendar alone. Our guide to how often to stain a deck walks through the signs that a deck is ready, and the full staining steps themselves belong to a separate how-to, which we will link here once it is published. In the meantime, the water test is a useful check: sprinkle a few drops on dry boards, and if the water soaks in rather than beading, the wood is thirsty for a finish. Once the deck is fully dry, see how to stain a wood deck for the full preparation, sanding and finishing steps. If you are weighing whether to do the next step yourself or hire it out, our guide to deck cleaning cost factors explains what changes a quote, from deck size and condition to access and the amount of growth. It helps to read that before you call anyone, so you can tell a fair quote from a padded one. Call a pro when the deck has rot, a wobbly rail, a soft or springy board, or growth that returns within weeks of cleaning, since those signs point past dirt to structure or drainage. A pro can also be the right call for a large deck, a tall deck, or a deck you cannot safely reach, and for any job where a pressure washer is the only tool that seems to work. DIY cleaning fits a sound deck with surface dirt and growth. It stops fitting when boards feel soft underfoot, when a rail moves, when a post looks rotted at the base, or when the deck slopes or drains toward the house. Those are inspection and repair jobs first, and cleaning second. A contractor who cleans without checking structure is selling you a clean deck that still needs work. Before you hire, ask what cleaner they use, what pressure they run, and whether they use a fan tip. If the answer is a single high pressure for every deck, or chlorine bleach as the default cleaner, keep looking. The right crew will ask about your wood type before they quote, and they will tell you when a deck needs repair before it needs a wash. Wear eye protection and gloves for every cleaning job, protect plants and nearby surfaces before you start, and keep children and pets off the deck until it is rinsed and dry. Cleaners irritate skin and eyes, pressure washers cut skin fast, and a wet, soapy deck is a fall risk even for someone used to it. Wet all plants before you apply cleaner, and rinse them again after. Cover delicate plants if the label suggests it, and keep cleaner out of ponds, drains, and vegetable beds where you can. Never spray toward windows, outlets, or people, and never point a pressure washer at your own feet to clean your shoes. It sounds obvious, and it is the kind of accident that happens when someone is tired at the end of a long section. These are the sources actually opened for this article. Cleaner strengths, pressures, and drying times follow the labels and guidance linked here, and where sources disagreed on a number, this article gives the gentler range and tells you to test first. Yes. Scrub an oxygen bleach cleaner into the boards with a stiff brush, working with the grain, and rinse with a garden hose. It takes longer than a machine rinse, and it is gentler on soft and older wood. Most routine deck cleaning does not need a pressure washer at all. An oxygen bleach cleaner is the best default for most wood decks. It handles dirt, mildew, and algae without the fiber damage linked to chlorine bleach. For heavy graying or prep before staining, use a commercial cleaner made for wood decks, followed by a wood brightener. Stay at or under 1,500 to 2,000 PSI for pressure-treated pine, and lower for cedar and redwood, using a wide fan tip and a steady distance. The washer should only rinse loosened grime, not strip dirt off the boards. Always test a hidden board first, and stop if the wood fuzzes or grooves. Allow at least 24 to 48 hours of dry weather, and longer in shade or humidity. The boards need to be dry through, not just dry on the surface, before stain goes on. If you are unsure, wait another day. Staining damp wood traps moisture and shortens the life of the finish. Do not use household chlorine bleach as a routine wood deck cleaner. It can strip finish and preservative, damage wood fibers, and leave a washed-out color. Oxygen bleach is the safer bleach for wood, and it is a different chemical, not just a weaker version of the same thing. Clean ipe gently, with a soft or medium brush, a cleaner made for hardwoods, and a brightener if the boards have grayed. Skip the pressure washer where you can, rinse fully, and let the deck dry for at least a day or two before any oil. Ipe is dense and slow to absorb, so patience matters more than pressure. A deck that stays slippery when wet still has growth on the surface, or the cleaner dried before it was rinsed. Scrub the slick patches again with fresh cleaner, rinse until the water runs clear, and do the slip test after rinsing. If slip returns within weeks, look for the cause: shade, poor drainage, or debris trapped between boards.Which cleaner should you use?
Cleaner
What it does well
Wood-safety notes
Oxygen bleach (sodium percarbonate)
General dirt, mildew, algae, light graying
Safe default for most wood decks when mixed as labeled. Rinse plants well after use.
Commercial wood deck cleaner
Heavy dirt, graying, and prep before staining
Follow the label closely. Stronger formulas can still damage soft wood if left to dry.
Wood brightener (oxalic acid)
Evens color, removes tannin and rust marks, neutralizes cleaner
Use after cleaning, not instead of it. Rinse fully, and keep it off plants where you can.
White vinegar, diluted
Light surface grime and small spot work
Weak on deep stains and growth in the grain. Can harm nearby plants, so rinse them after.
Chlorine bleach (household bleach)
Kills surface growth fast, which is why people reach for it
Not a routine wood cleaner. It can strip finish and preservative, damage fibers, and leave a washed-out color.
Cleaning by wood type
Pressure-treated pine
Cedar and redwood
Ipe and tropical hardwood
What to do after cleaning
When to call a pro
Safety checks worth taking seriously
Sources
Frequently asked questions

5 Comments
Pingback: How to Stain a Wood Deck: Prep, Sanding & Lasting Finish
Pingback: How Long Does a Wood Deck Last? Lifespan by Wood Type
Pingback: How to Identify Green Growth on a Deck | Home Exterior Lab
Pingback: Can You Put a Fire Pit on a Wood Deck? Clearances and Safer Options
Pingback: How to Maintain a Wood Deck and Prevent Rot